

LOGO 2025 TM _Vertical_Black
Dufour logo
LOGO 2025 SS_Navy_EN
FREQUENTLY ASKED QUESTIONS
 

 CONTENT

Embarking and basic lights on board
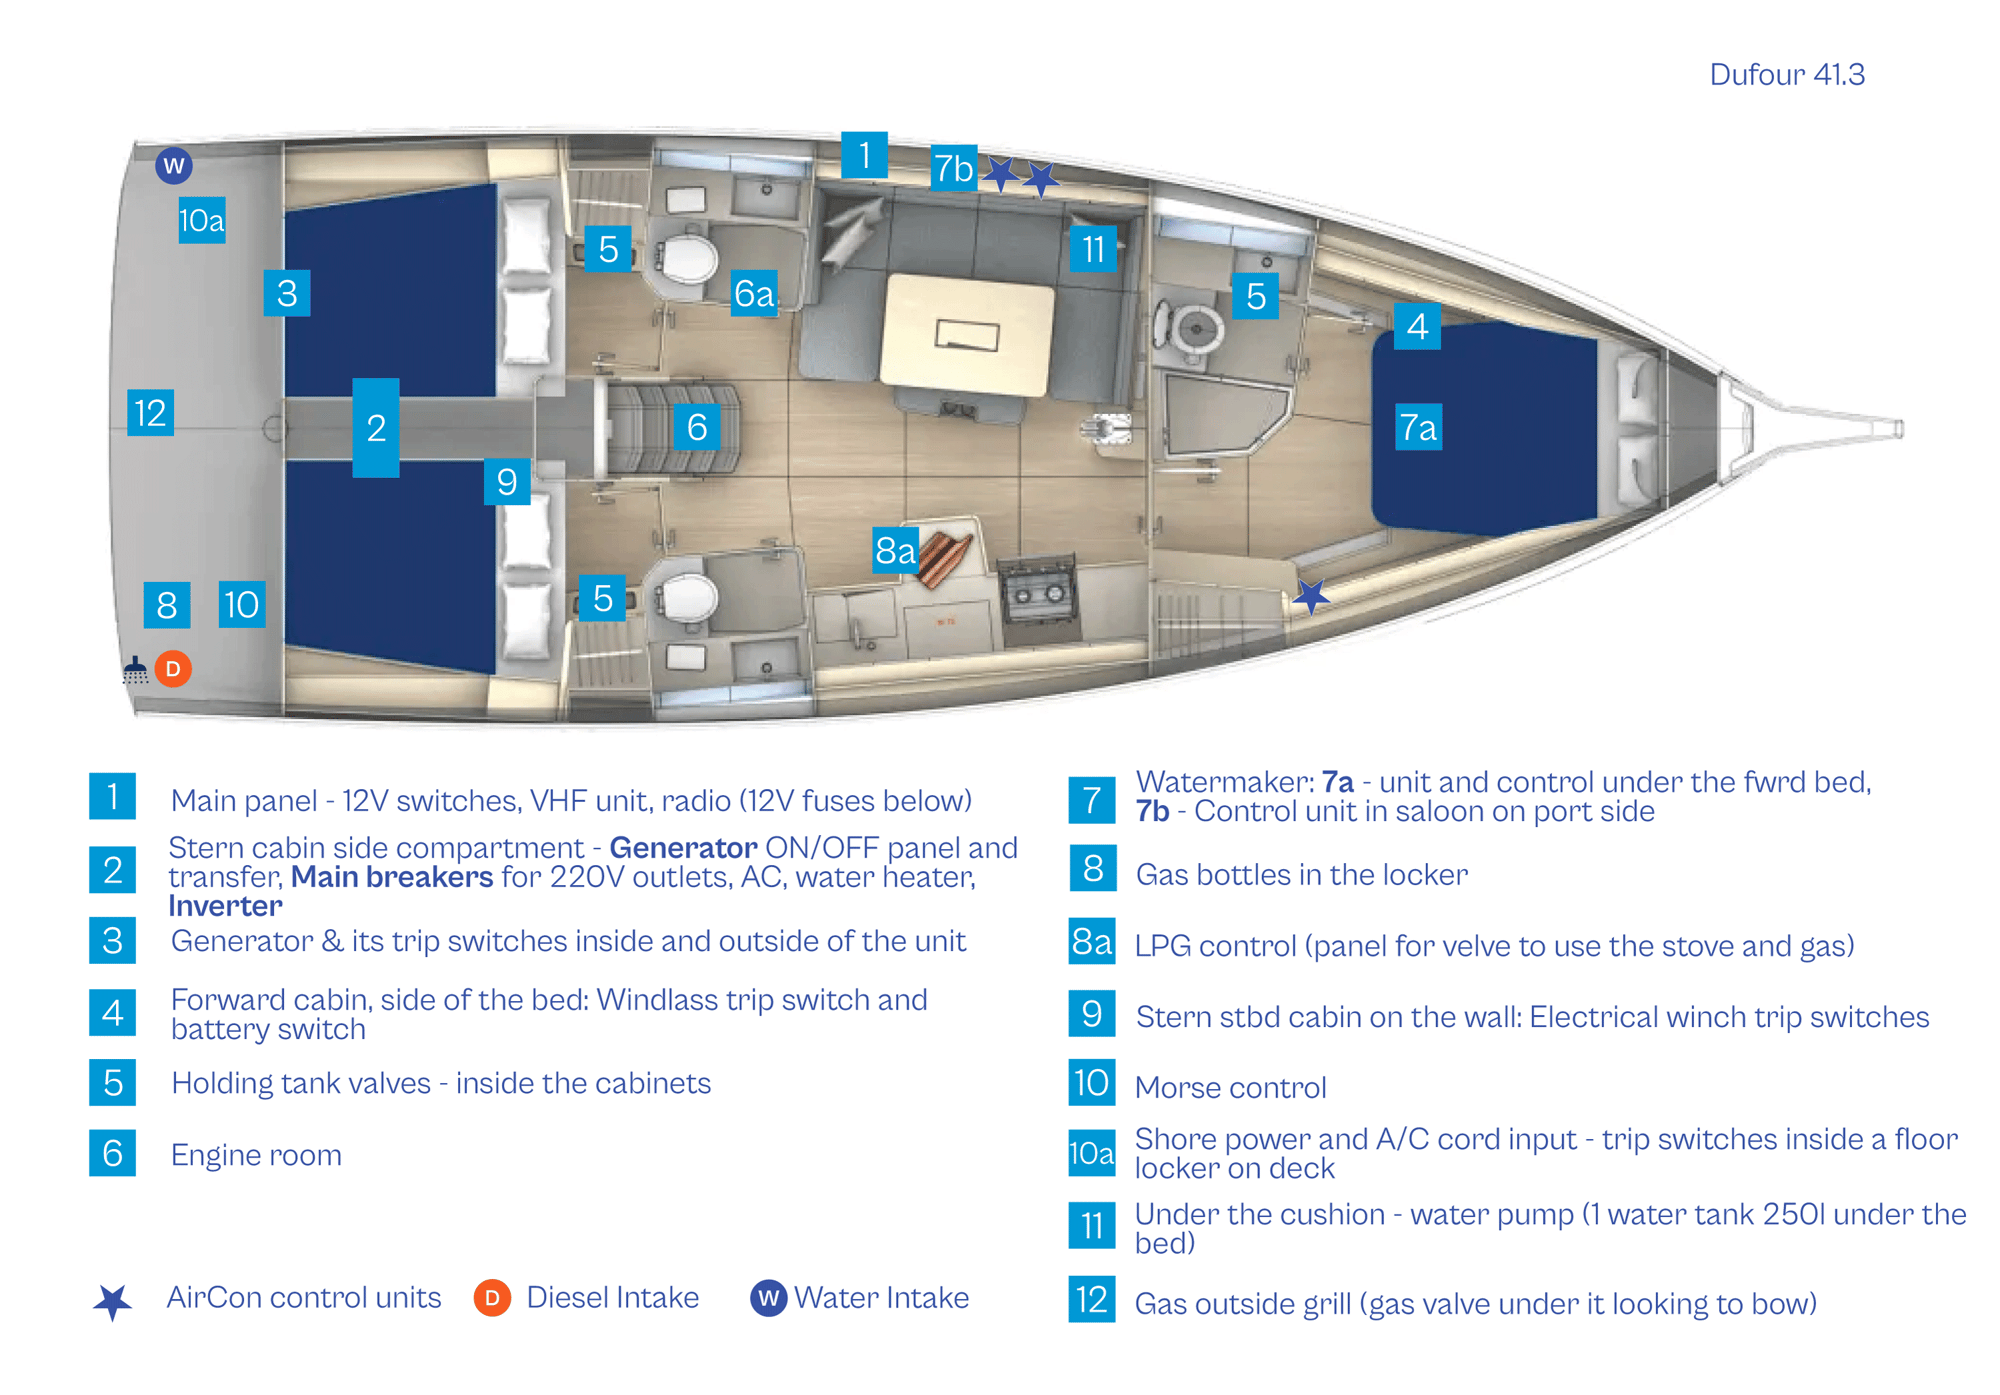
1 - Main panel - 12V, Levels display, VHF Unit, radio, (12V fuses below)
2 - Stern cabin side compartment - Generator ON / OFF panel, Transfer between Gen / Shore power, Main breakers for 220V outlets, A/C. water heater, Inverter
3 - Generator unit & generator trip switches inside and outside unit
4 - Forward cabin, side of the bed: windlass trip switch and battery switch
5 - Holding tank valves (Read here for heads and showers description.)
6 - Engine room 
7a - unit and control under the forward bed;
7b - remote control unit in saloon on port side (For Fresh water tank capacity see here.) 
8 - Gas bottles- one full and one in use.
8a - LPG control panel. See more about Stove usage
9 - Stern STBD cabin on the wall: electrical winch trip switches
10- Morse control 
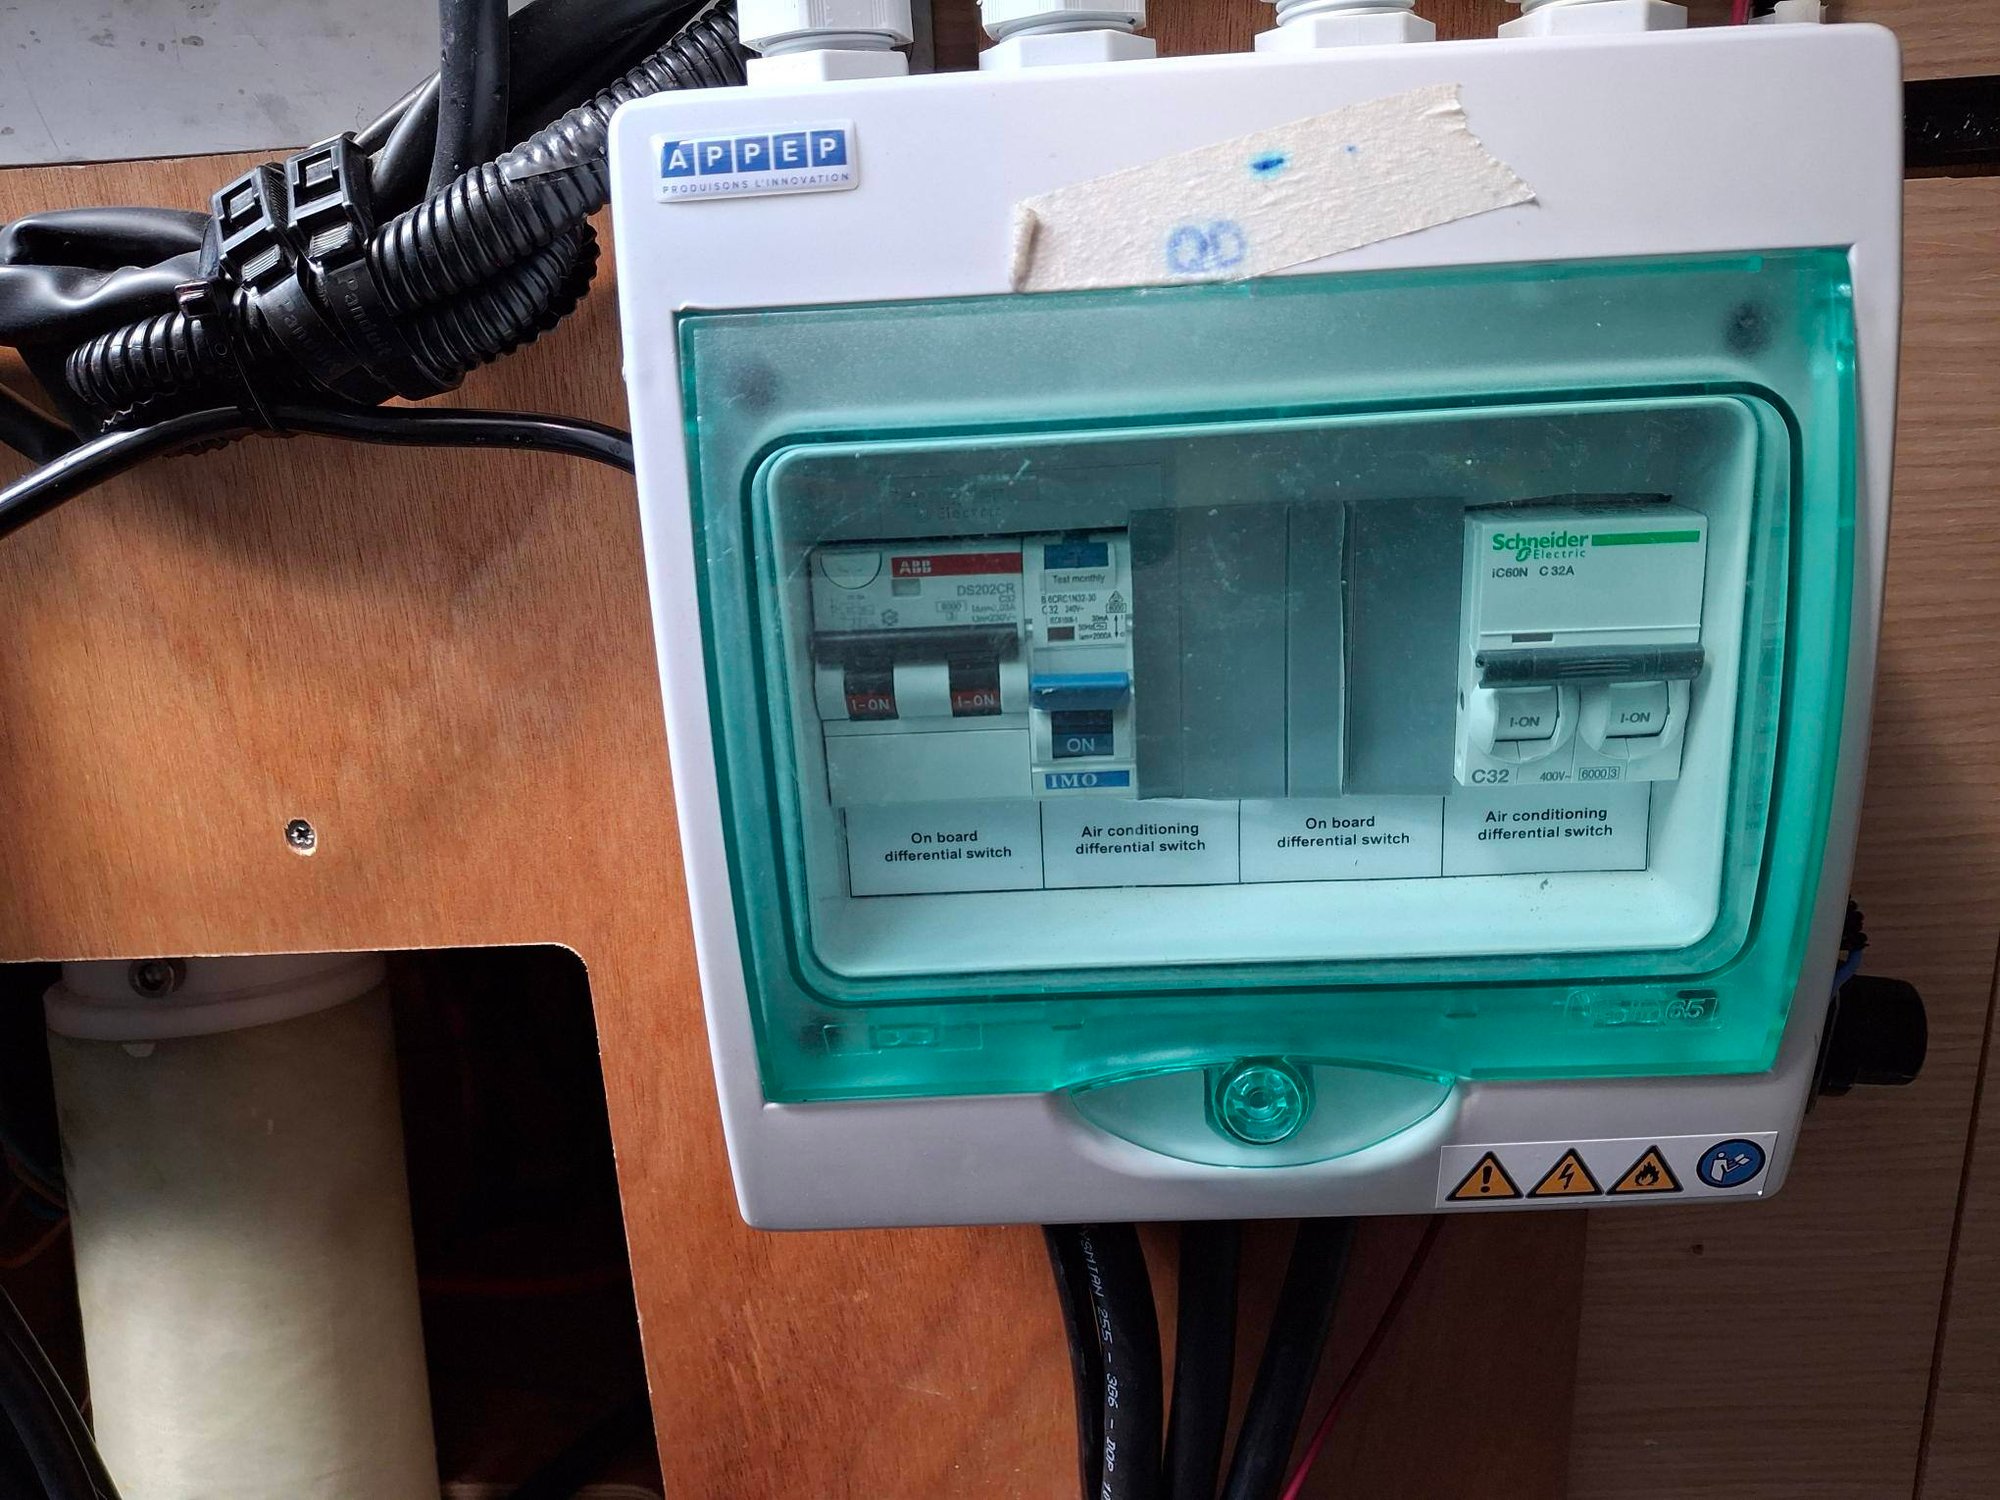
10a - Shore power and AirCon trip switch inside a floor locker on deck
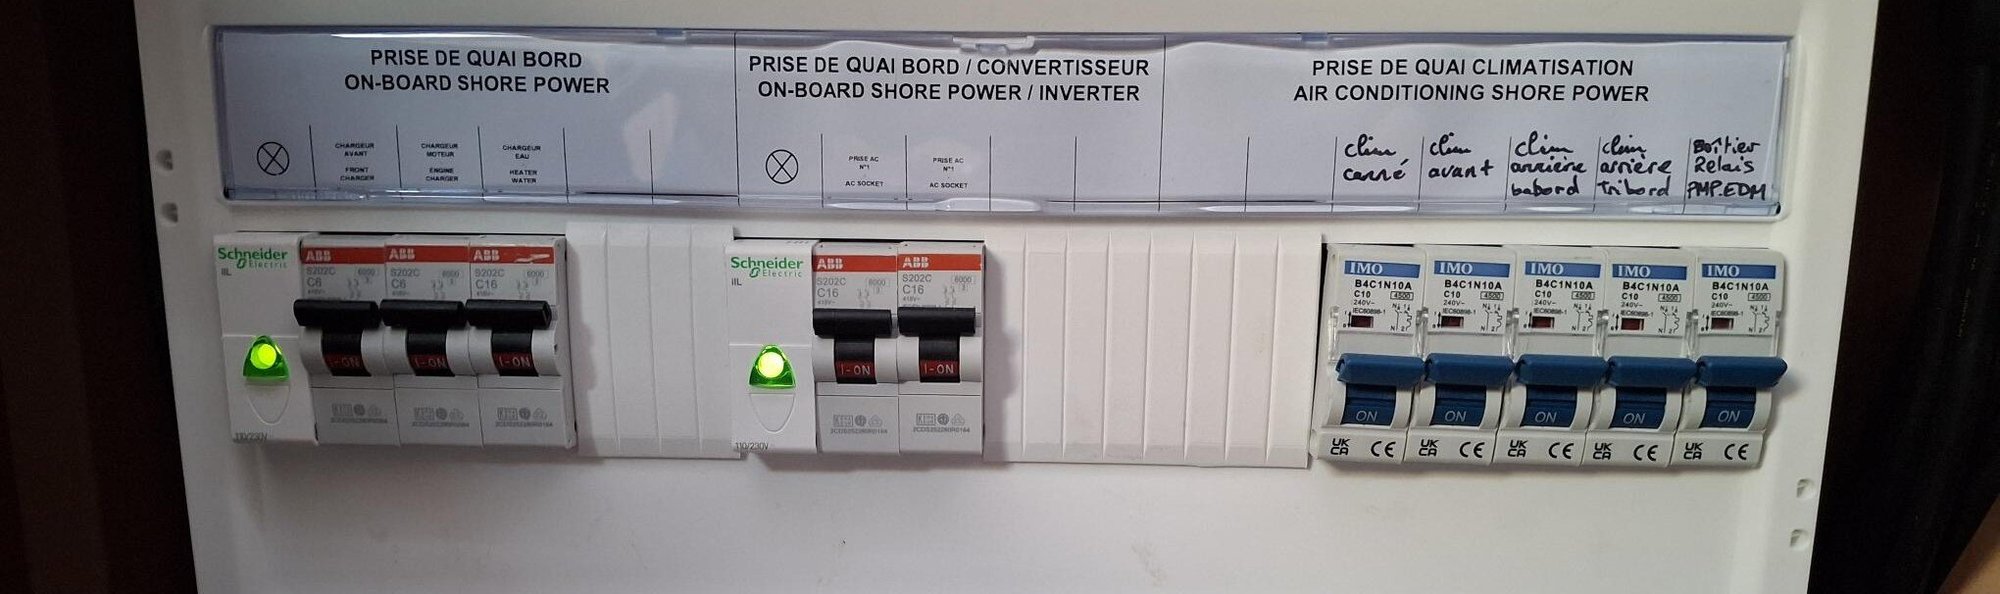
11- 220V Shore power main breakers & Air Conditioning trip switch (under the cushion)
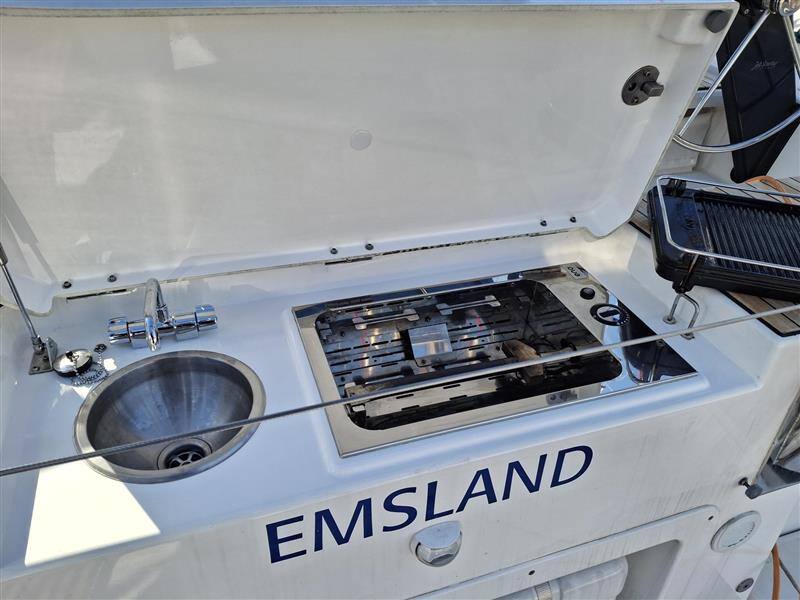
12- Gas grill outside
 
*Star sign*  Air Conditioning control panels 
Orange D letter - top up diesel there
Blue W letter - tup up water there
 
Still not working? Call us
 
   EMBARKING AND LIGHTS
 
Welcome aboard!  Be careful when embarking and always step in the middle of the plank first. We'd recommend putting your dinghy on the bow railing before sailing in, so you have both cleats free for the mooring line.
 

ENTERING THE COCKPIT

We always leave our boats unlocked before boarding. The keys to the boat will be inside or on the skipper's table. Please make sure you DO NOT lock your boat before disembarkation at the end of your charter. 
 

THE COCKPIT TABLE

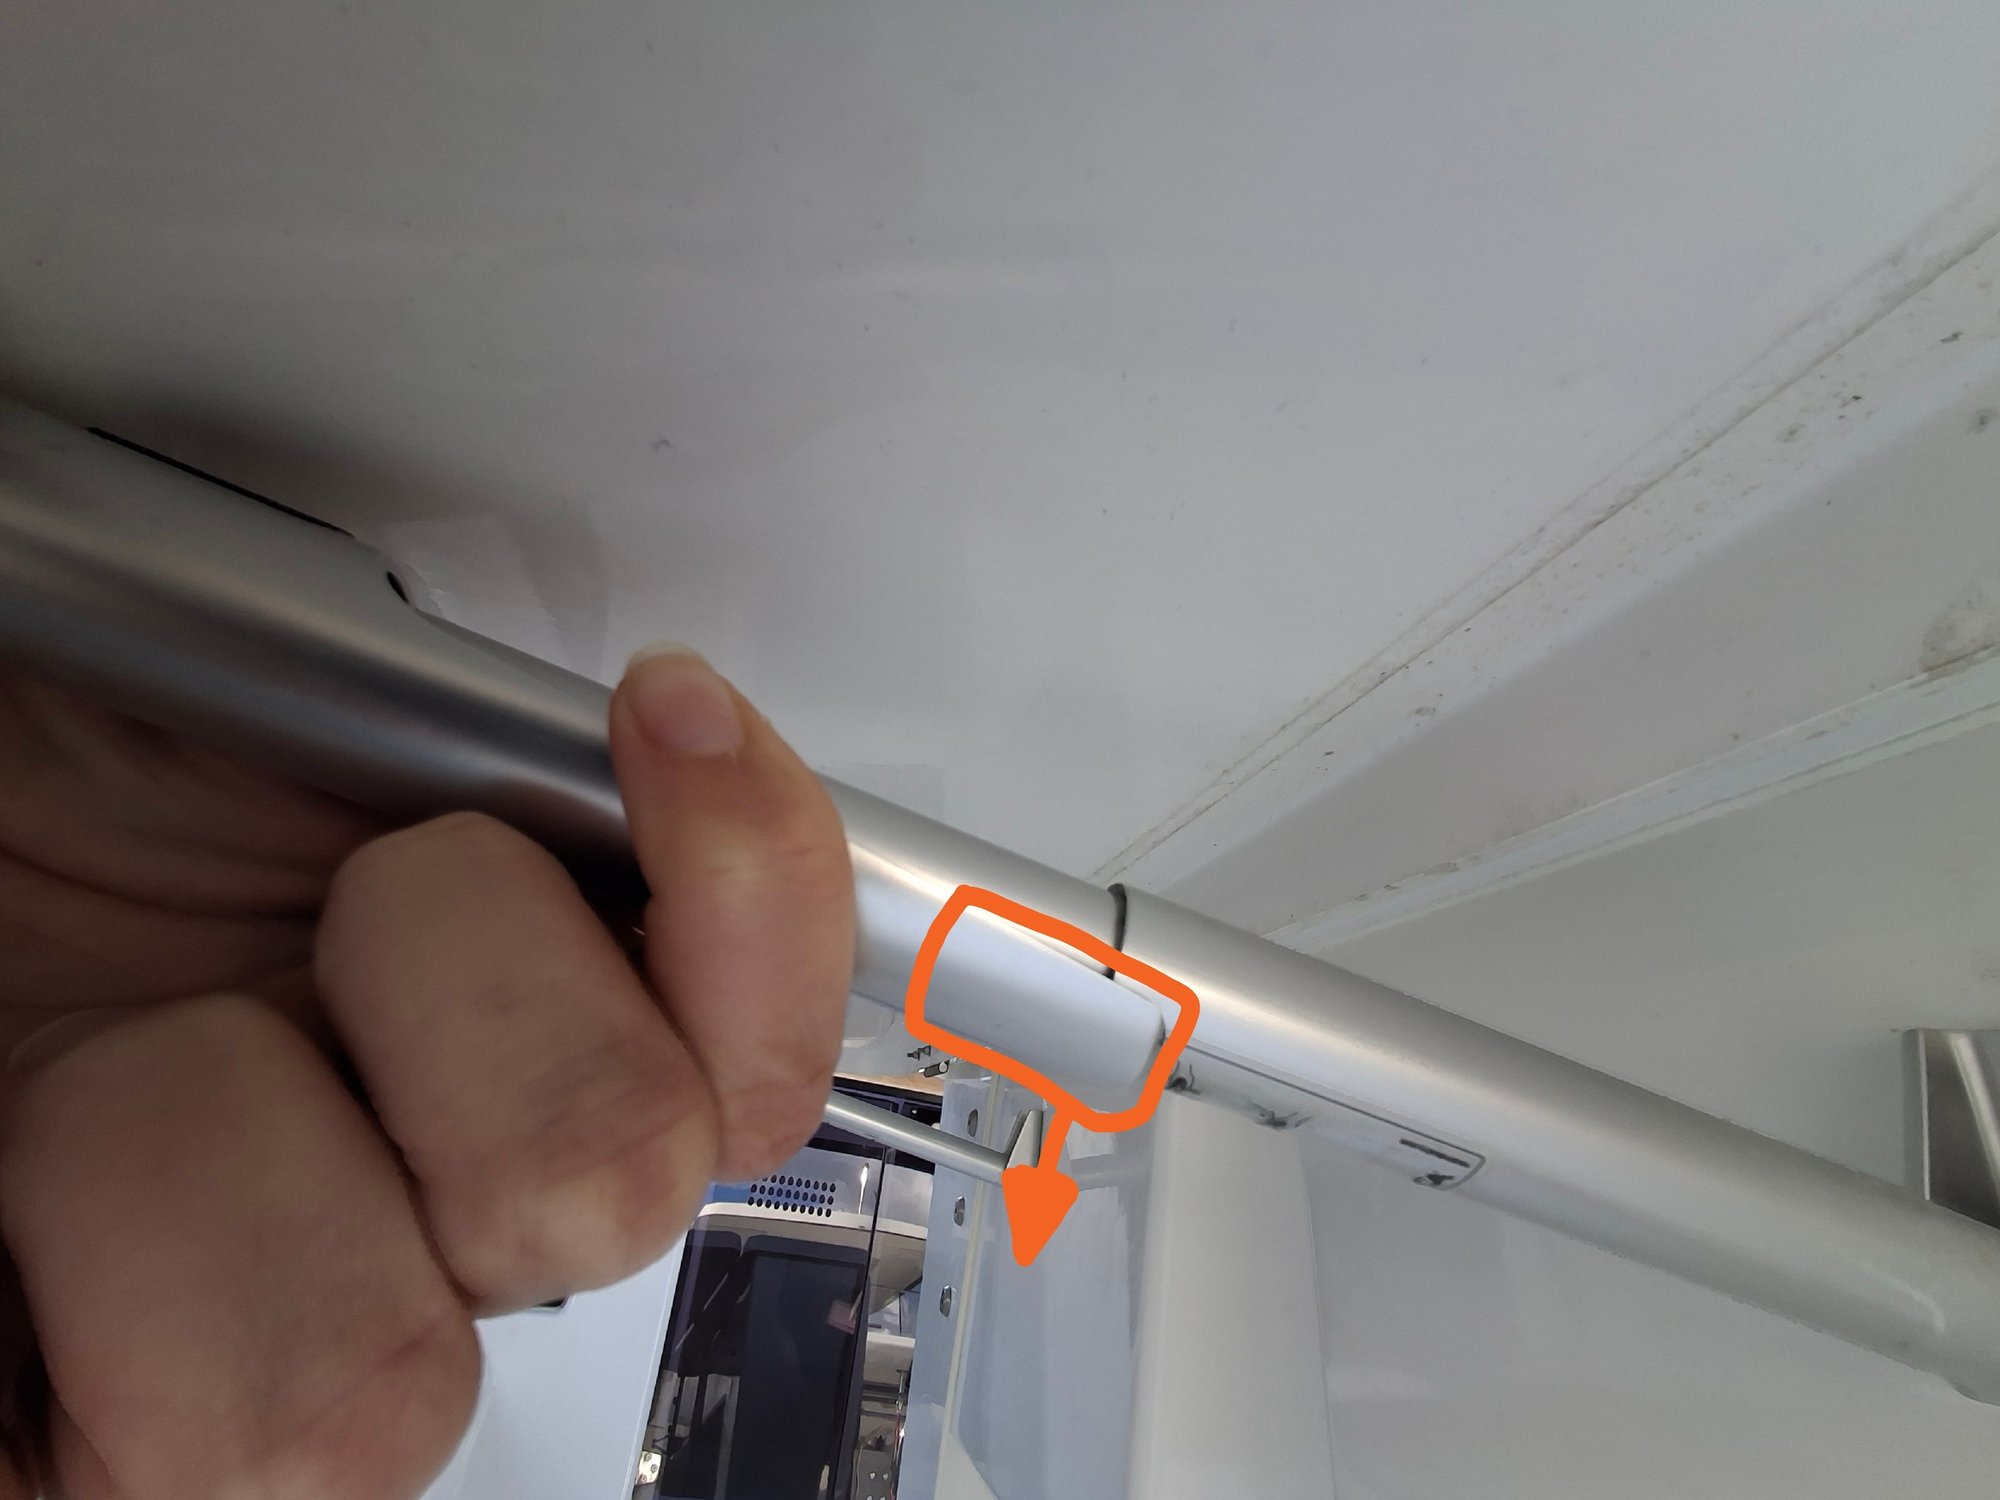
To open the cockpit table, just lift its sides upwards until it clicks. To close the table for easier passage sit in the middle of the table, lift the side of the table more up, and locate the metal holders beneath it. The thin metal leaves need to be simultaneously lifted so the table side can be lowered. 
 
Duf table below
 

THE COCKPIT TABLE

To open the cockpit table, just lift its sides upwards until it clicks. To close the table for easier passage sit in the middle of the table, lift the side of the table more up, and locate the metal holders beneath it. The thin metal leaves need to be simultaneously lifted so the table side can be lowered. 
 

LIGHTS

Some boats have different placement for light switches. The main lights switch for cabins, saloon and cockpit is on the main panel.
 
On this vessel, the light switches are generally on the walls. The little black reading lights have an almost invisible button on them to turn on. In heads these is also a difficult-to-spot light switch under the mirror. 


 MAIN PANEL
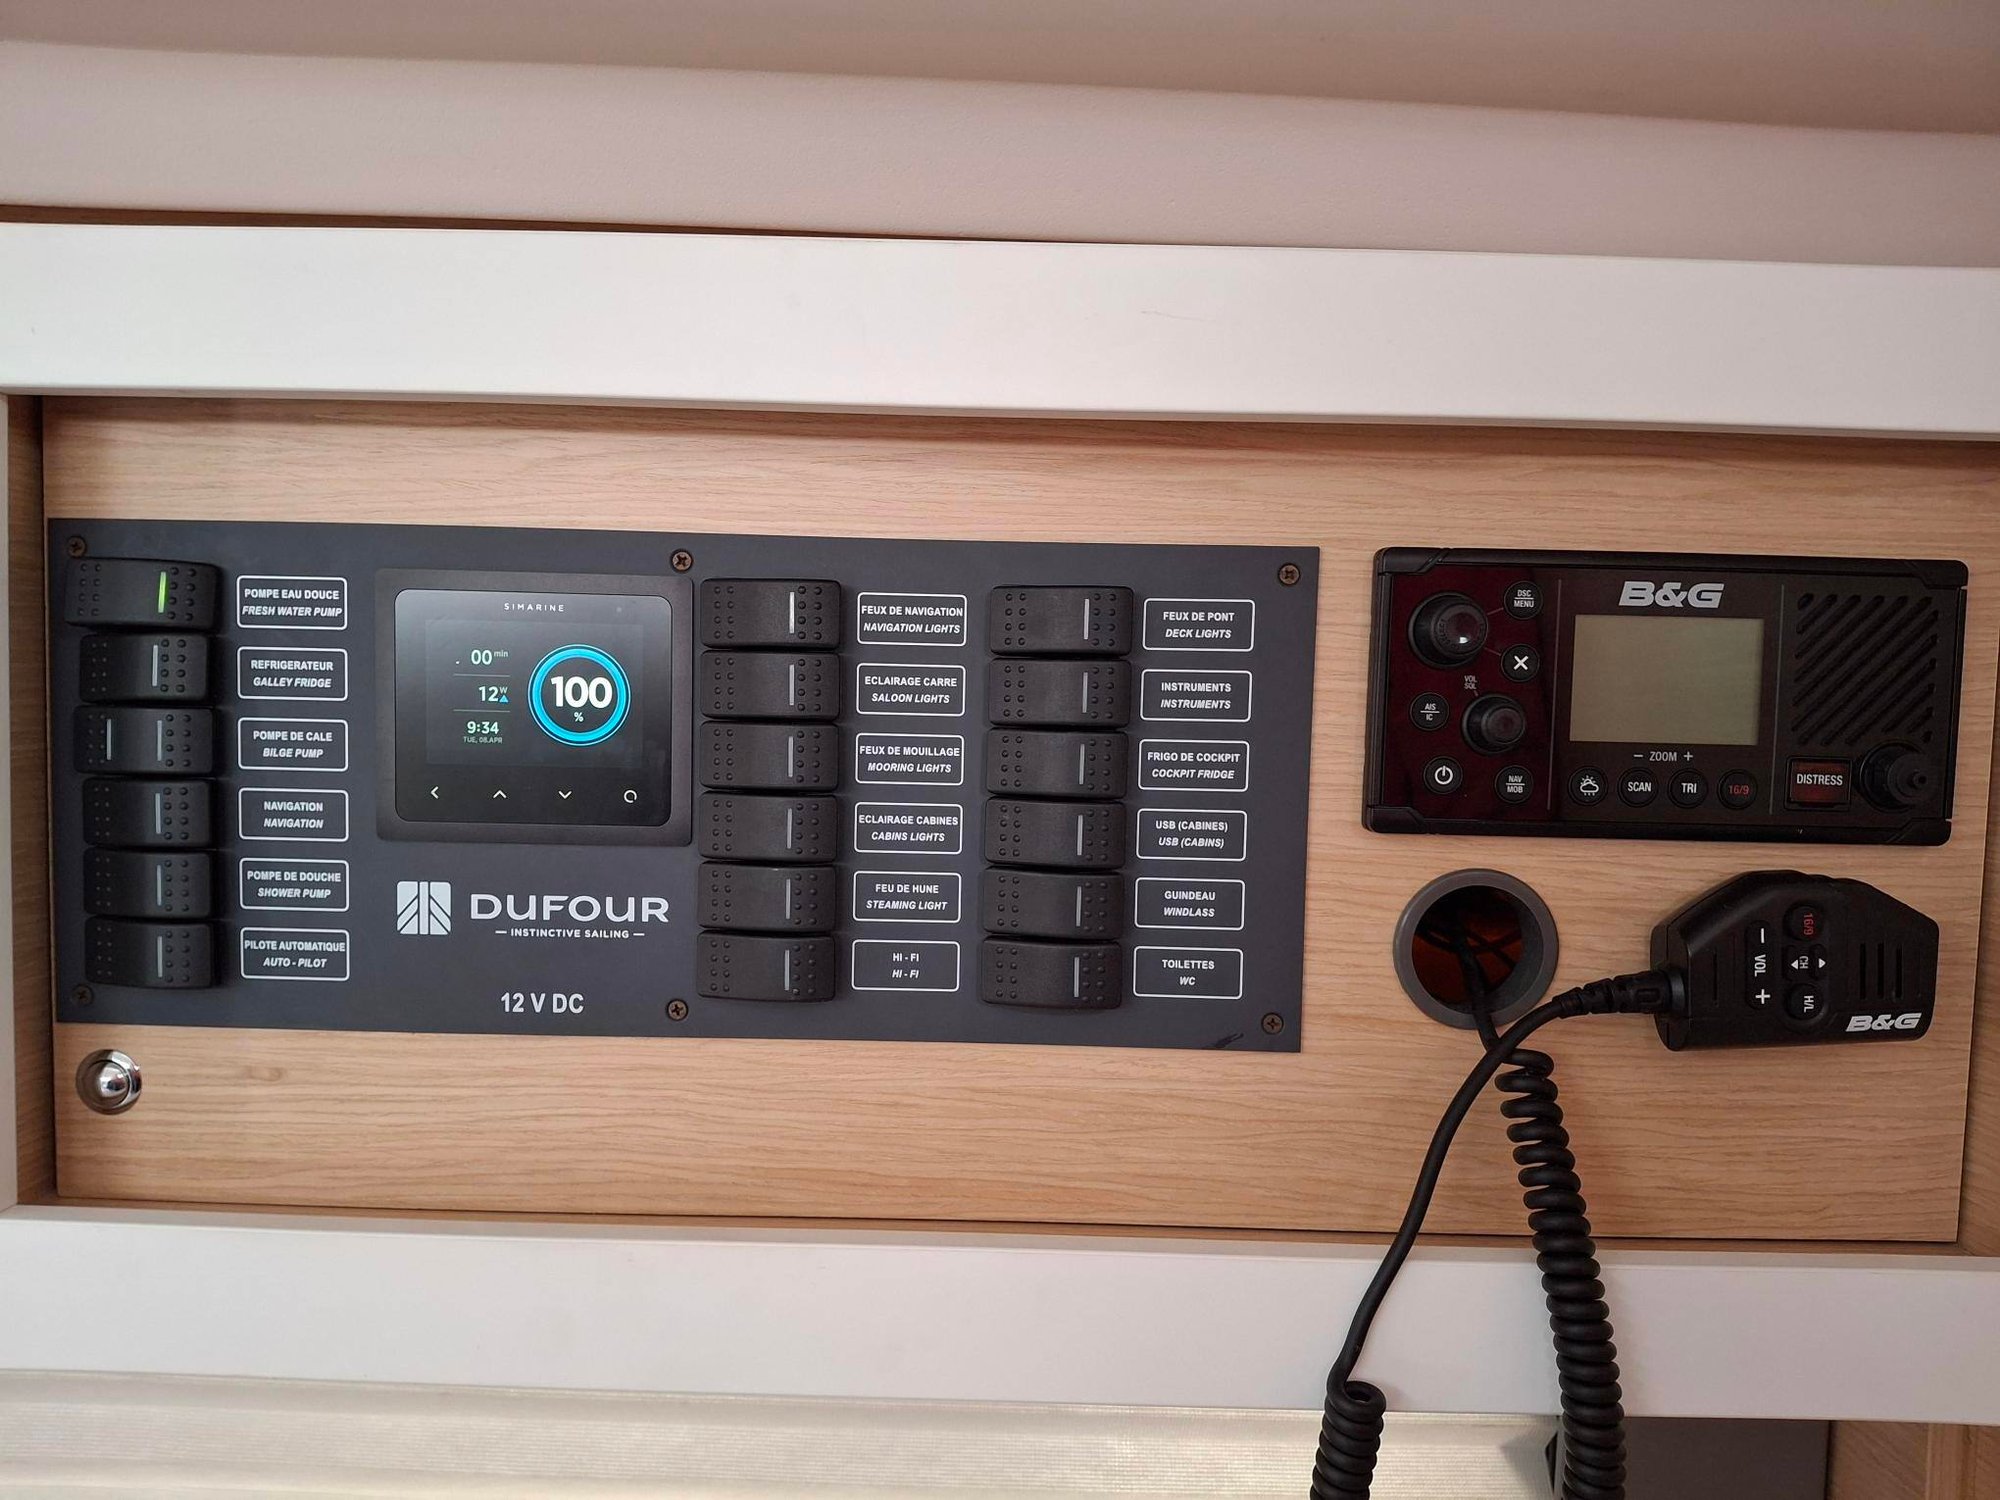
44.3 Dufour Emsland main panel
 
The main panel contains (starting at the top to bottom, then left to right):
  • 12V switches: Fresh water pump, Fridge, Bilge Pump, Navigation (both this one and Instruments switch needs to be on to use the plotter above deck), Shower Pump, Autopilot
  • A display for the view of levels of water and diesel, and view of batteries voltage
  • 12V switches: Navigational Lights (remember no night navigation!), Saloon Lights, Mooring Lights, Cabin Lights, Steaming Light, Hi-Fi (Radio), Deck Lights (Built in to bimini), Instruments (both this one and Navigation switch needs to be on to use the plotter above deck), Cockpit fridge (this is a spare, there is no cockpit fridge available), USB ports in cabins, Windlass (cannot use anchor without it!), WC (Flushing)
  • VHF radio


 RADIO AND VHF ON THIS VESSEL

This vessel uses Fusion Radio - the unit is under the TV, and B&G VHF unit. For more information about each, see our Radio and VHF site from the main FAQ website
 
  STERN CABIN SIDE COMPARTMENT
44.3 Dufour Emsland generator panel (3)
 
It contains (from left to right): 
 
GENERATOR POWER SWITCH - see below for Generator start and usage. 
GENERATOR SWITCH OVER - switch between using shore power and generator power for your outlets and AirCon
WINDLASS TRIP SWITCH - In case the windlass is overloaded, this trip switch will shut down. 
 
 
  GENERATOR
44.3 Dufour Emsland generator panel (3)
 

STARTING THE GENERATOR

  • Make sure all your breakers are OFF and the switches are on 0 in the stern cabin side compartment  (no. 2 on the boat layout
  • First slide preheat for a couple of seconds holding the switch on the left
  • Press the generator start  switch UP while still holding the preheat switch
  • Continue holding the preheat switch for a short while. 
  • Position the transfer switches to position 1 to use generator power.
  • Be aware of the generator load when using.

SHUTTING DOWN THE GENERATOR

  • Turn off the equipment you were using
  • Reposition the switches in the side panel to position 0. 
  • Hold the generator start switch in the downward position until the generator shuts down.
  • Reposition the switches to position 2 only after you connect to shore power to utilize it. 
 

NEVER RUN THE GENERATOR WHILE UNDER WAY!

Make sure not to overload your generator, sometimes you can only run one thing at a time. (like only your A/C, or only your water maker, or only the microwave) Using any electrical appliance at the same time as A/C can trip the generator breaker. 
 

GENERATOR TRIP SWITCHES AND INTAKE FILTER

The generator itself is in the stern of the yacht, marked with number 3 on the boat layout picture. If you have overloaded your generator, it will trip out. In that case turn everything off that was using the electricity generated from it, turn off the generator, and start everything from the beginning. To access the trip switches to check their position, you need to take the panel away, and see if both the trip switch on the side of generator, as well as the one INSIDE the generator are in the upwards position. 

If the intake filter becomes blocked (by seaweed or other debris), it can cause the generator to overheat and stop.

44.3 Dufour Emsland generator (4)
  BATTERIES
 
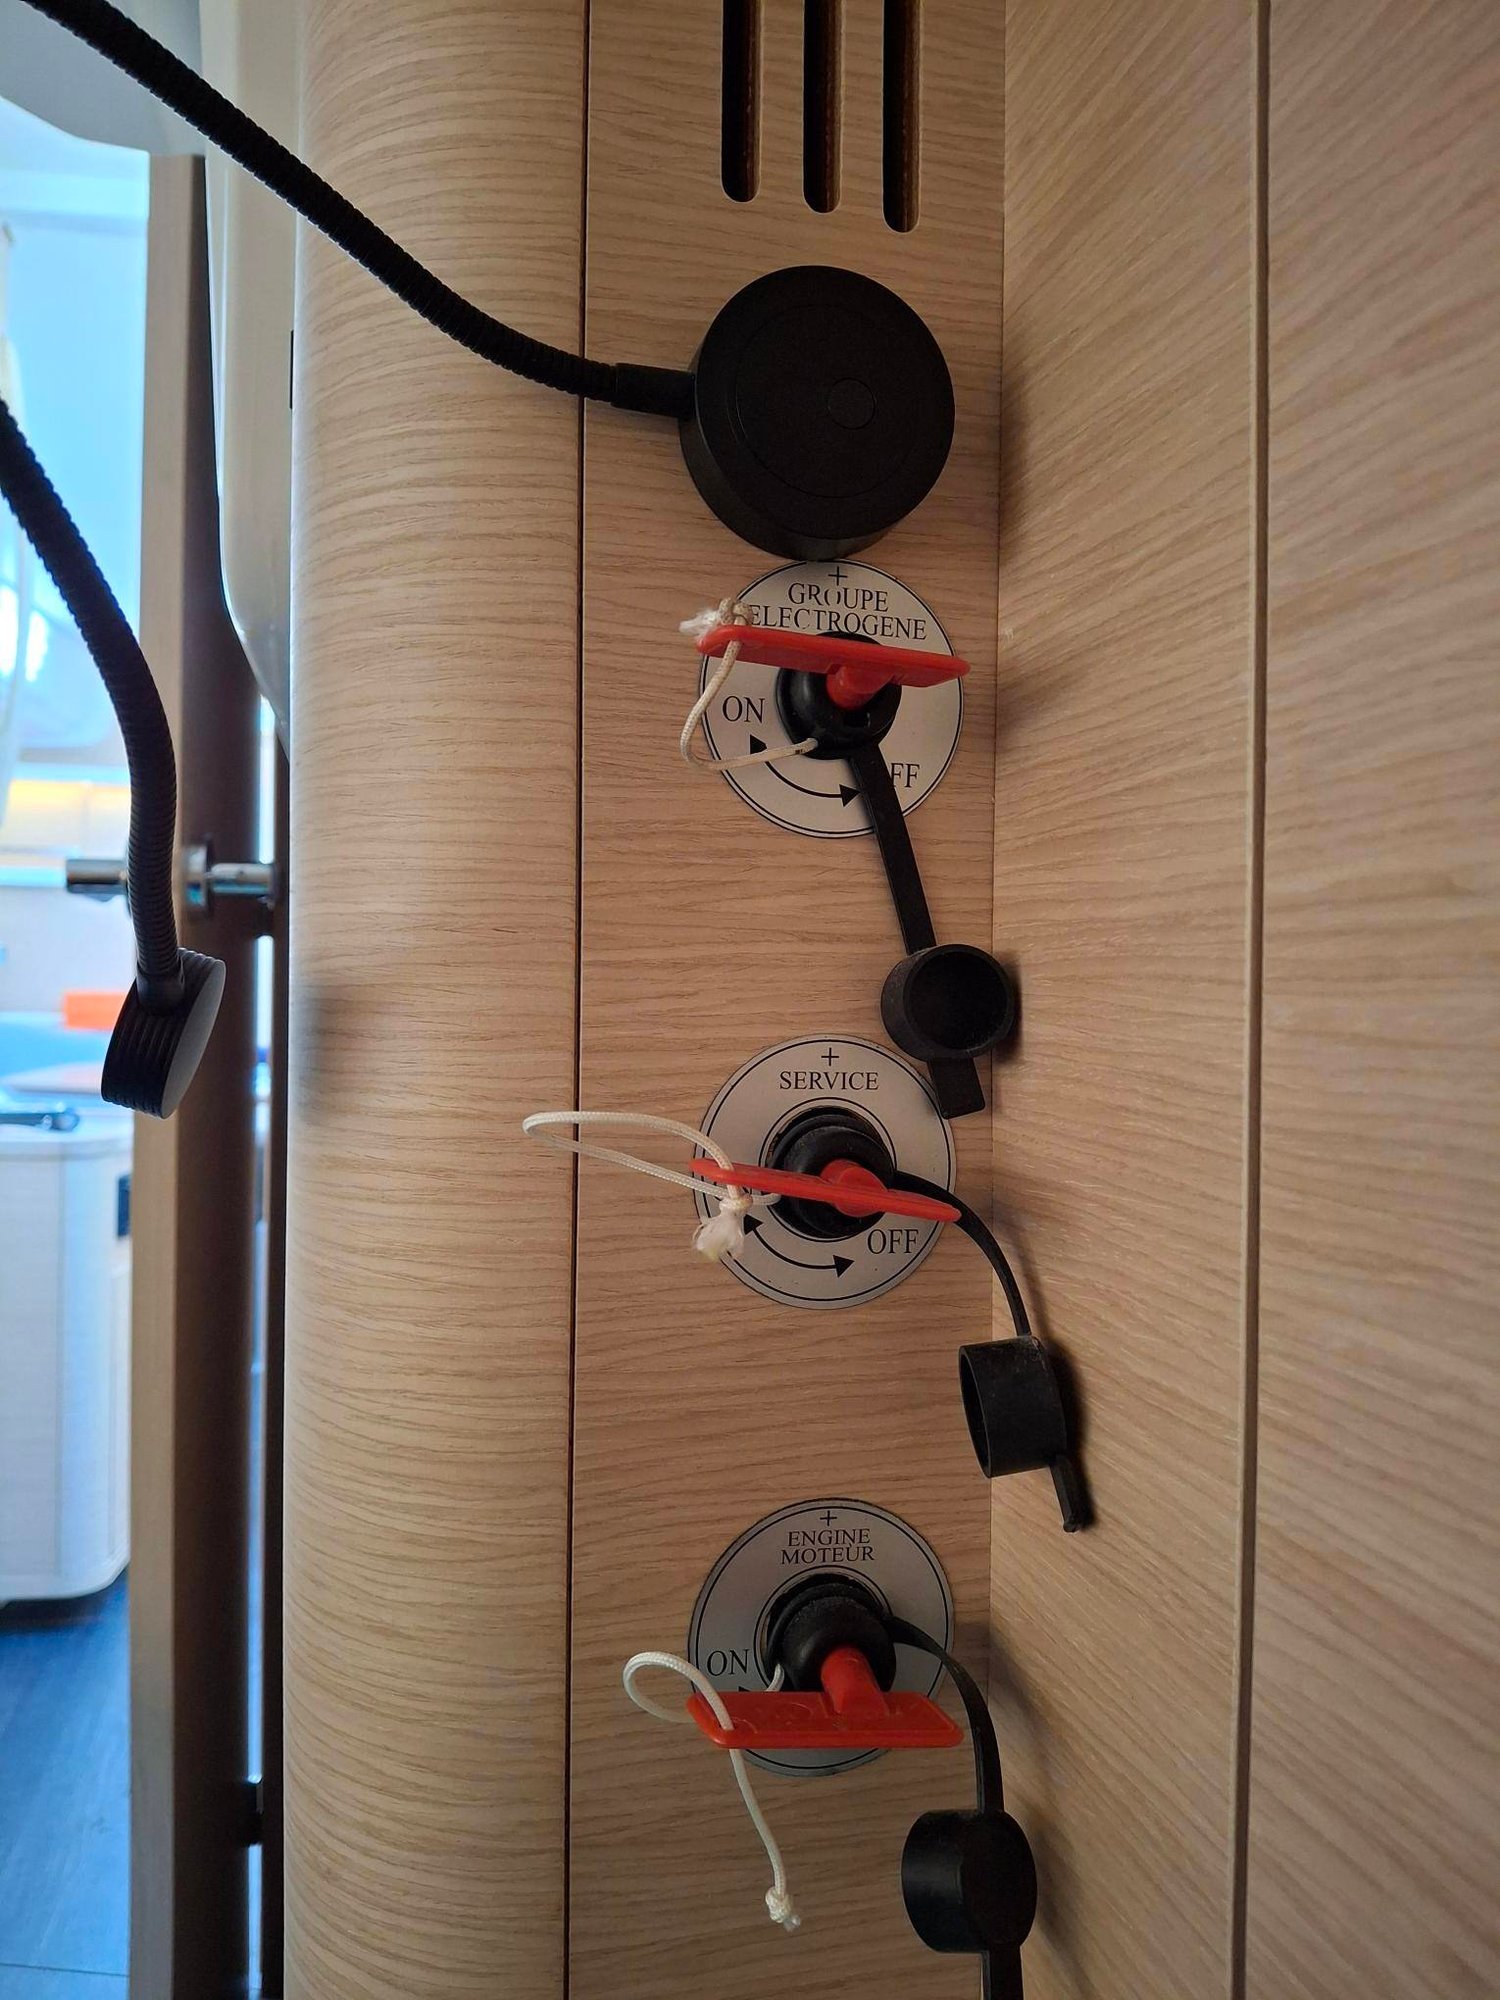
The 12V domestic batteries panel and its switch is in different positions for numerous types of boats.On this boat the main domestic batteries switch is on the wall of the stern port cabin, together with the Generator and Engine battery breaker (no 4b on the layout picture), and the switches are on the main panel (no. 1). The domestic batteries charge the yachts lights, fans, fridge and freezer units, water, heads and shower pressure and drains, navigational and sailing instruments, as well as the radio and VHF.
 
On this yacht the water maker cannot also use the 12V electricity.
 
 
Please be aware that batteries are best recharged by engines, then the generator and shore power source, and sometimes by the solar panels. We recommend recharging the batteries with engines at least twice a day for a few hours. To do that while not underway, enter neutral RPM's by pressing the red button on the throttle, and push the throttle forward while it is pressed. Go up to 2000 revs and then back to 1500 to charge the batteries.
 
We recommend turning off unnecessary equipment during the night, especially drawing your attention to underwater lights, fridge, freezer and inverter. 
 
 
44.3 Dufour Emsland battery main switches
 HEADS
 
This boat has 3 heads, and 3 holding tanks with 3 holding tank valves to empty them (marked no. 5 on the boat layout picture). The holding tank valves are all inside the cabinets - below the wireless charge in the cabins, and below the sink in the forward head.
 

SHOWER DRAIN

Shower drain on this boat is automatic, so the shower drain pump will automatically turn on to pump out the water while you are showering.  
Remember to check if your 12V panel switch for SHOWER PUMP is on in order to use.  
 

TOILETS FLUSHING BUTTON

There is a flushing switch next to every toilet. It can be pushed to the left and right. Pushing it to the right will drain the bowl, while pushing it to the left will rinse the bowl with clean (salt) water.
We recommend topping up the bowl with clean water fully and draining it after every flushing, to avoid the return of unclean water to the toilet or unpleasant odours, due to the tanks being gravitational. 
Due to this boat having only 1 water tank, the flushing system uses salt water. 
 
Be careful to never put any paper or similar in the toilet! Sunsail and The Moorings reserve the right to charge a fee for additional cleaning and for each toilet blocked if deemed required.
 

HOLDING TANKS

The holding tanks on this boat are gravitational, meaning you can empty them simply by opening the holding tank valve. We recommend doing so daily, at least 3 miles offshore. Please remember to CLOSE the holding tanks while you are on an anchorage, mooring buoy field, or in a town or marina. Also, remember to empty all your holding tanks before coming back to the base. When the valve is lined up with the pipe (parallel), the valve is open. Turn it so it is crossing the pipe to make sure the valve is closed. 
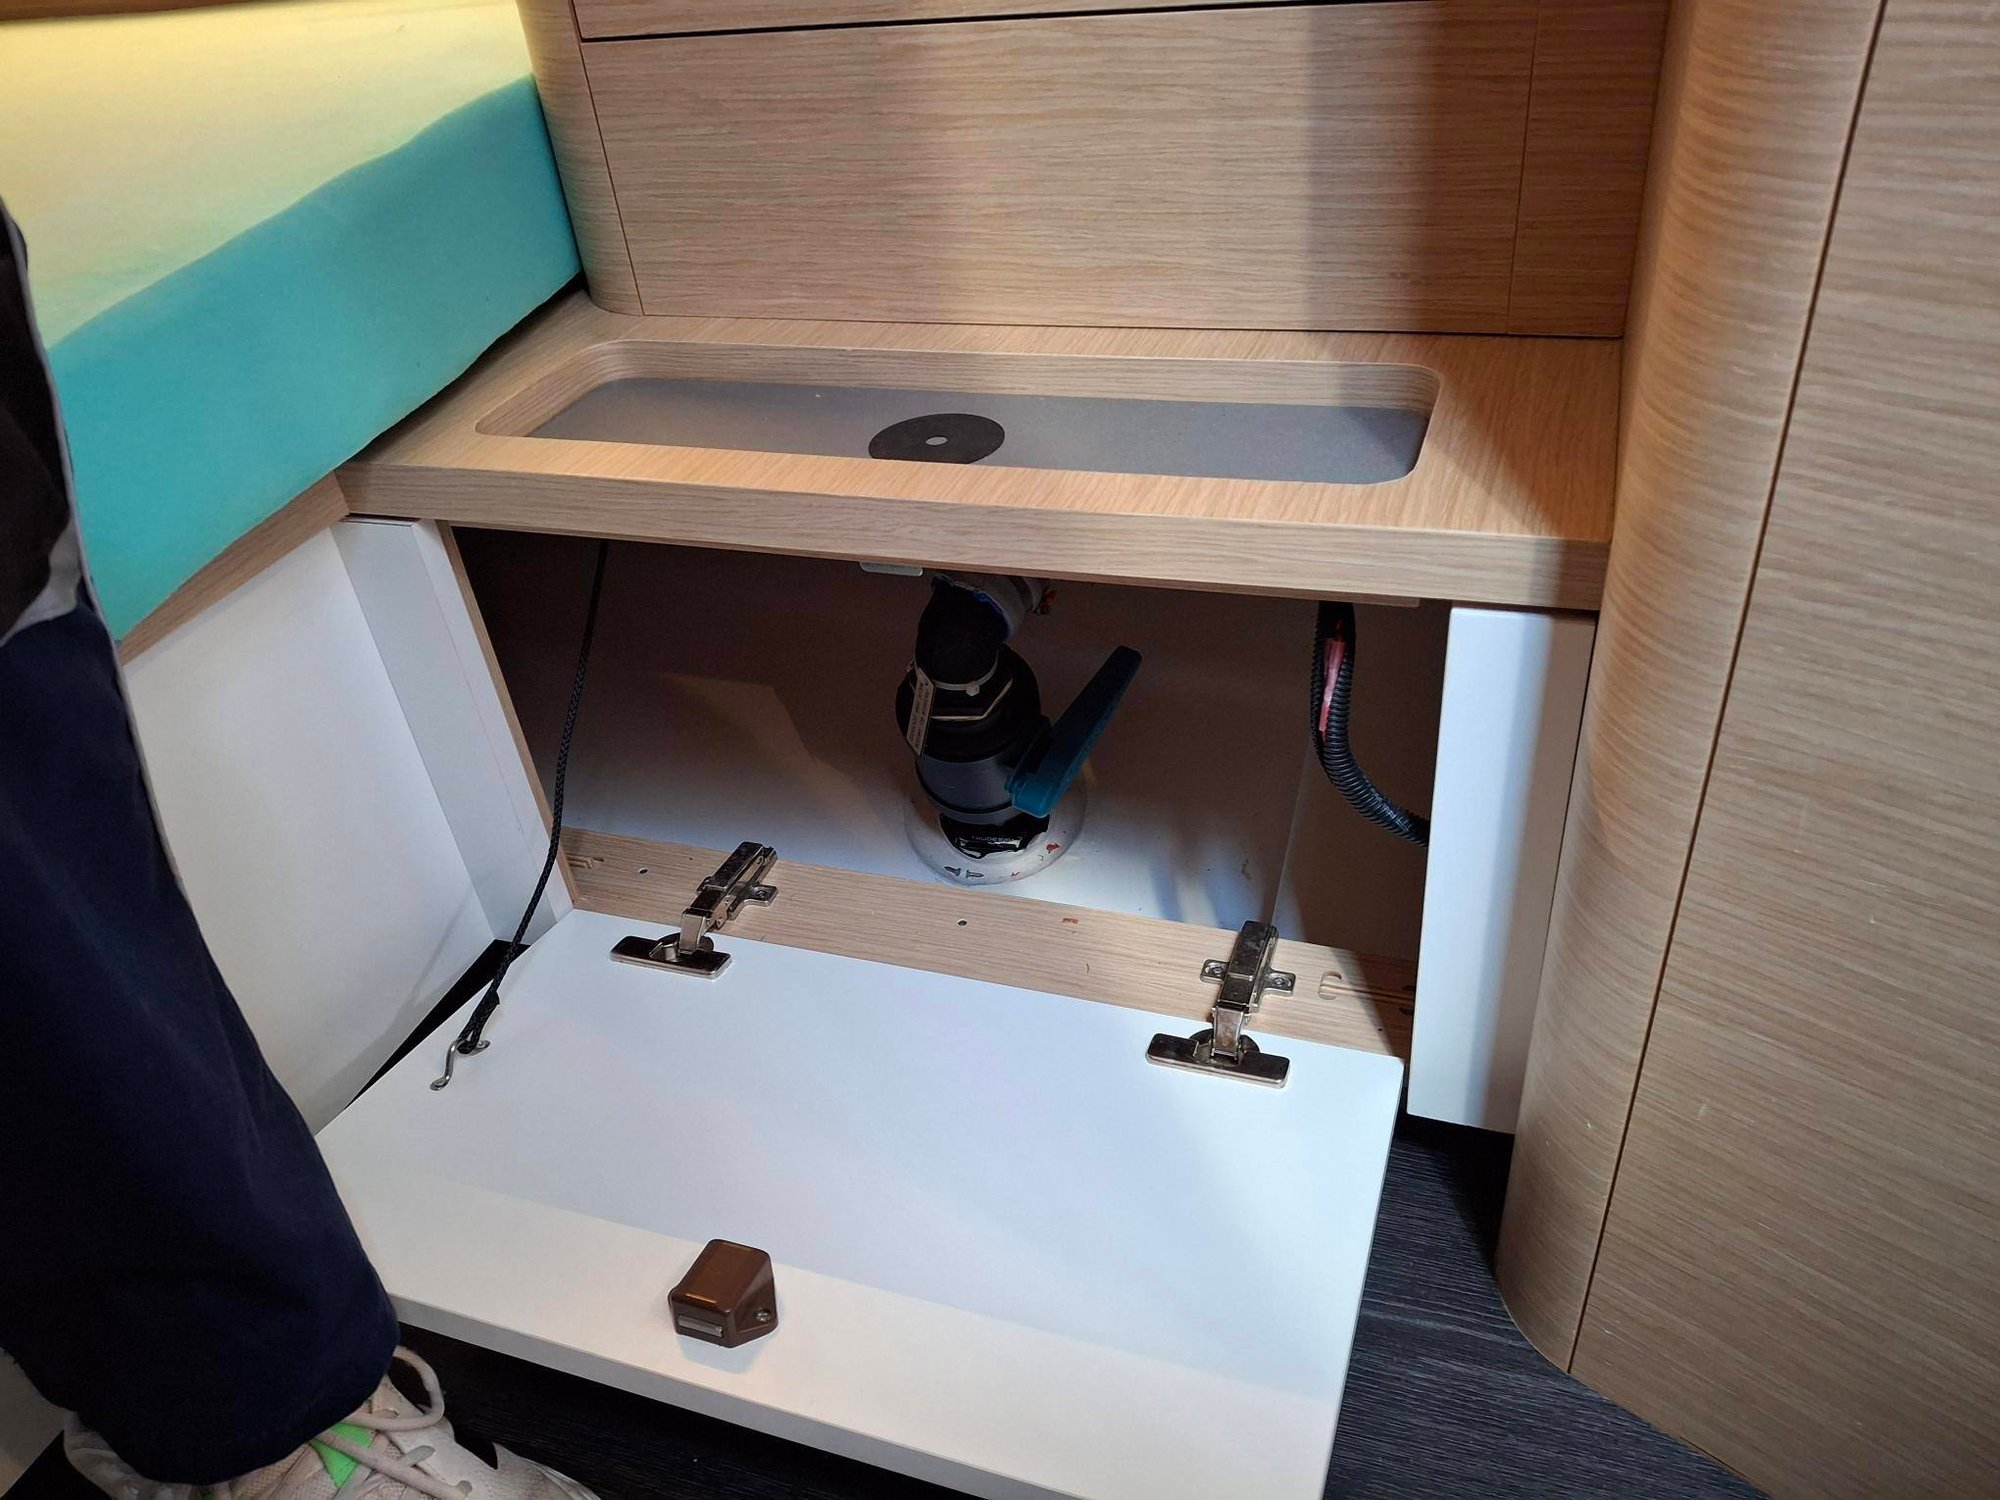
44.3 Dufour Emsland holding tank valve
 AIR CONDITIONING
 
This boat has 4 Air Conditioning Units, and 4 Air Conditioning panels, marked with a star on the boat layout picture: 
  • 1 unit in each stern cabin, the control display is on the side of the cabin
  • 1 unit for the saloon, the control display is on the port side
  • 1 unit in the forward cabin, the control display is on the starboard side 

CONTROL PANEL

Make sure you have either the shore power connected or the generator connected through the panel in the stern port cabin wall. More details on generator connection and usage see on this page above). Remember you cannot use the A/C while under way. 
  • On the A/C panel press the POWER button to turn A/C on or off.
  • On the three dashes button toggle between cool / heat /dehumidify.
  • Use the arrows UP / DOWN in the temperature section to adjust the temperature. We don't recommend going below 20 degrees Celsius. 
  • On FAN section adjust the speed of fans of the AirCon unit. Don't leave this setting on too low if you are on a low temperature as the unit may freeze over.  

KEEP YOUR DOORS AND HATCHES CLOSED!!

Please be aware that you need to close your hatches and doors to allow the Air Conditioning Units to operate properly.  If your unit stops cooling, but the fans are operating, it means the unit froze over due to its settings. Give it about half an hour to defrost and try again.
 

BLEED VALVES

If your A/C is counting down or showing HIP, it means the system has too high pressure needs bleeding. The valves to do that are marked with a number 6a on the boat layout. Best is to give us a call to do it for you. 
If your A/C is showing letters LOP, it means there is too low electrical current. Try changing the cables, or give us a call
 
Duf 44 klima (2)-1
  WATER MAKER
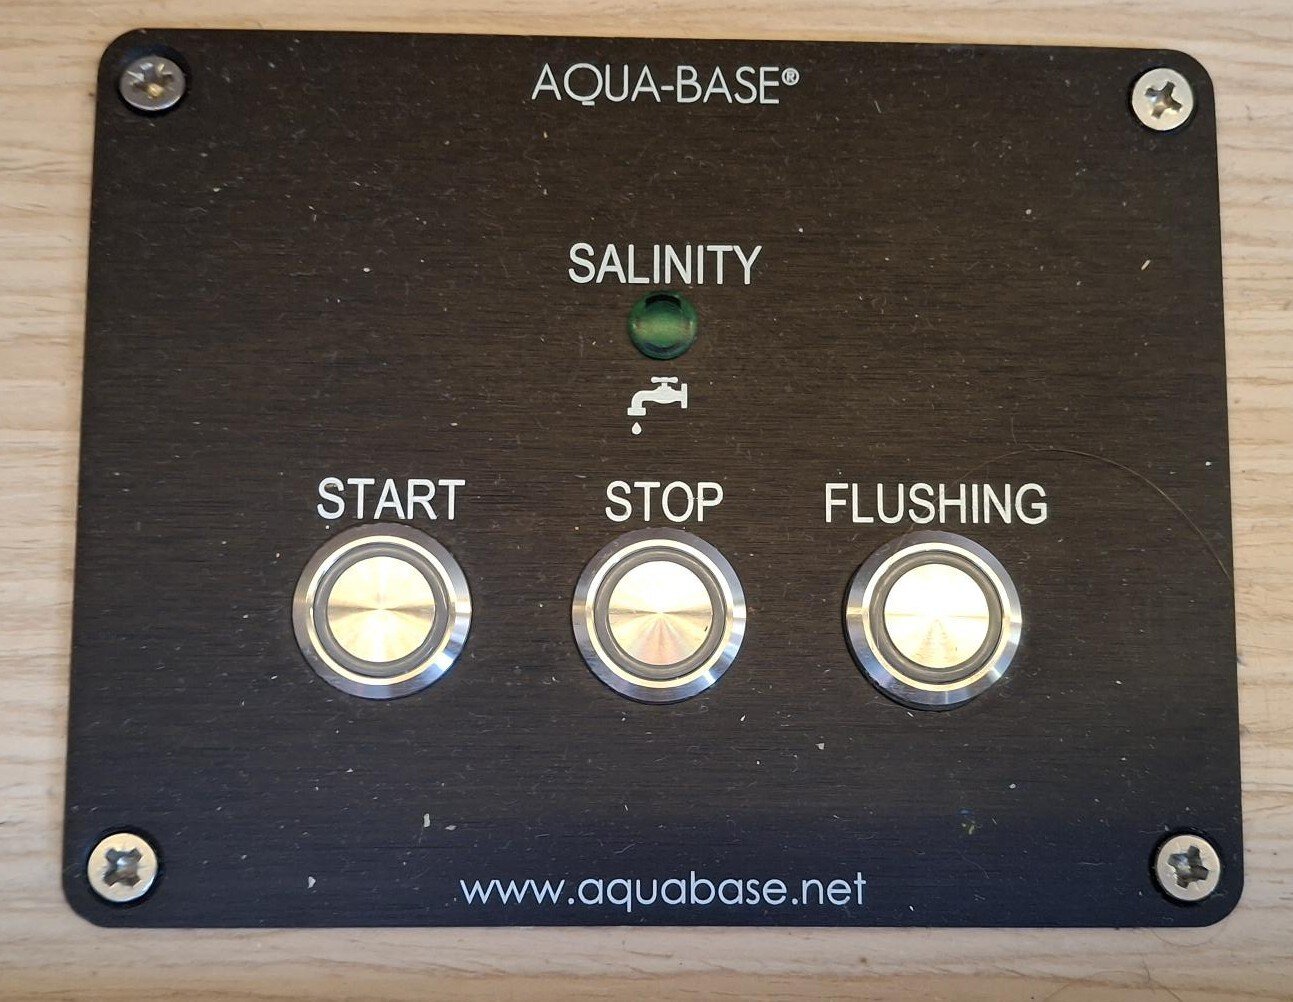
44.3 Dufour Emsland water maker panel saloon
 
This vessel needs a generator to run the watermaker. The watermaker unit is under the bed in the forward cabin (no. 7 on the layout picture). There is a control panel on the unit, but much easier is to use the remote panel, also marked with number 7, next to the TV. 
 
DO NOT USE YOUR WATERMAKER WHILE UNDERWAY!
 
The watermakers all have flushing sequences, we make sure to do that on every yacht turnaround. Please never use water makers in less than 2 meters of water, otherwise your watermaker filters will need to be exchanged. 
 

USING THE WATER MAKER

  • Make sure you are not underway and not in less than 2 m of water
  • Check that your water pump is ON on the main panel.
  • Turn ON your generator if you need.
  • Push the START button on the panel. The green light will start indicating the water production. 
  • Normal production of the water is between 40 and 60 litres per hour. Track your water levels on your main panel, and turn off the water maker when there is enough water in your water tank. Overfilling your water tanks can also cause breakages of the tanks themselves. 
  • Press STOP to stop producing water.
  • Wait a couple of minutes. 
  • Press FLUSHING button to flush the system. This will be a 3-minute process. After that, the system is in standby mode. 
  • Turn OFF your generator if you were using it.
  FRESH WATER CHANGE-OVER VALVES
 
This boat only has 1 water tank,  240l capacity. Make sure to keep an eye on your water levels during your charter, and plan your route with refilling stations or good places to use the water maker. Your water top-up inlet will have a blue rim around it, it is on the stern of the boat next to the port helm, and is not to be confused with other inlets above deck!  
   STOVE USAGE
 
Stove uses gas bottles stored above deck (no. 8 on the boat layout picture). One bottle in use is always connected to the system, and there is a second full one to exchange if needed. Always check the stove is operating to your satisfaction during the yacht briefing, and you have the spare gas bottle on board. 
 

USING THE STOVE

  • Open the gas bottle counterclockwise in the locker.
  • Check the yellow solenoid valve next to the stove in the cabinet is open.
  • Find the LPG control & detection under the sink. 
  • Click the ON button. The detection light will start blinking. After some seconds the light will stabilize and the VALVE ON light will be on. This means the stove can now be used safely. 
  • Turn the needed burner on. In case the installed igniter isn't working, there are some matches and a lighter in the drawer for that purpose. Sometimes it may take a couple of seconds for the gas to travel to the system, so keep the button pressed for a couple of seconds. 
  • Make sure you click the OFF button on the LPG and close the gas bottles when you are not cooking. 
 

GAS GRILL

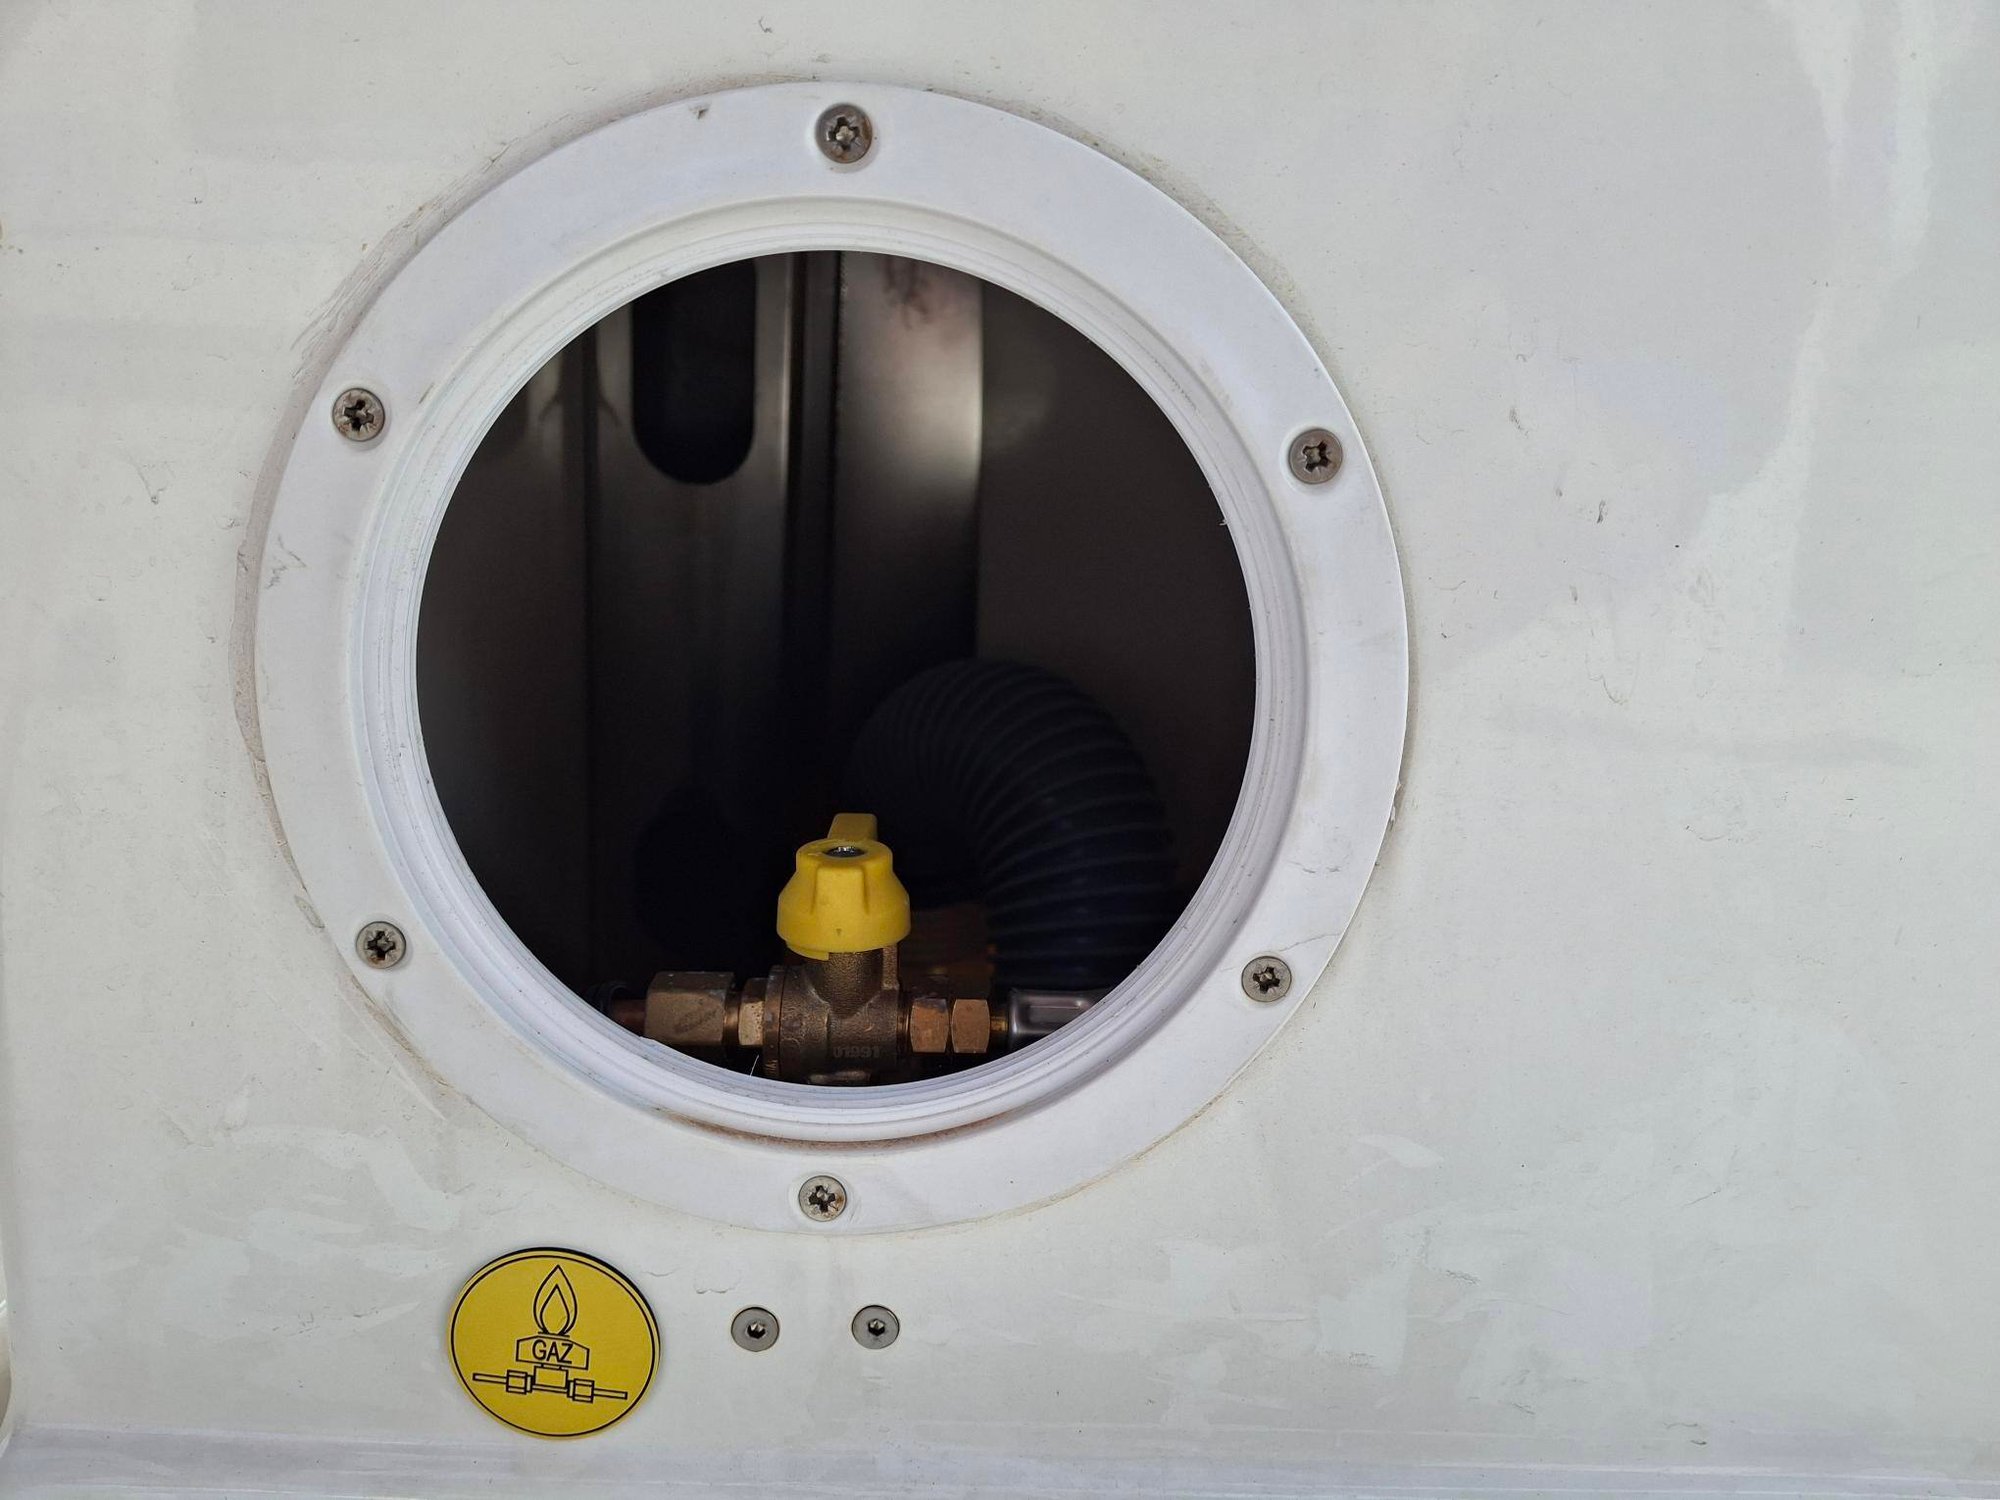
The gas grill above the deck, under the seating (no. 12 on the boat layout picture), needs the same procedure with the same LPG panel in order to be used. The gas valve is accessed from the inside of the boat, from a round access point at the bottom of the seat. 
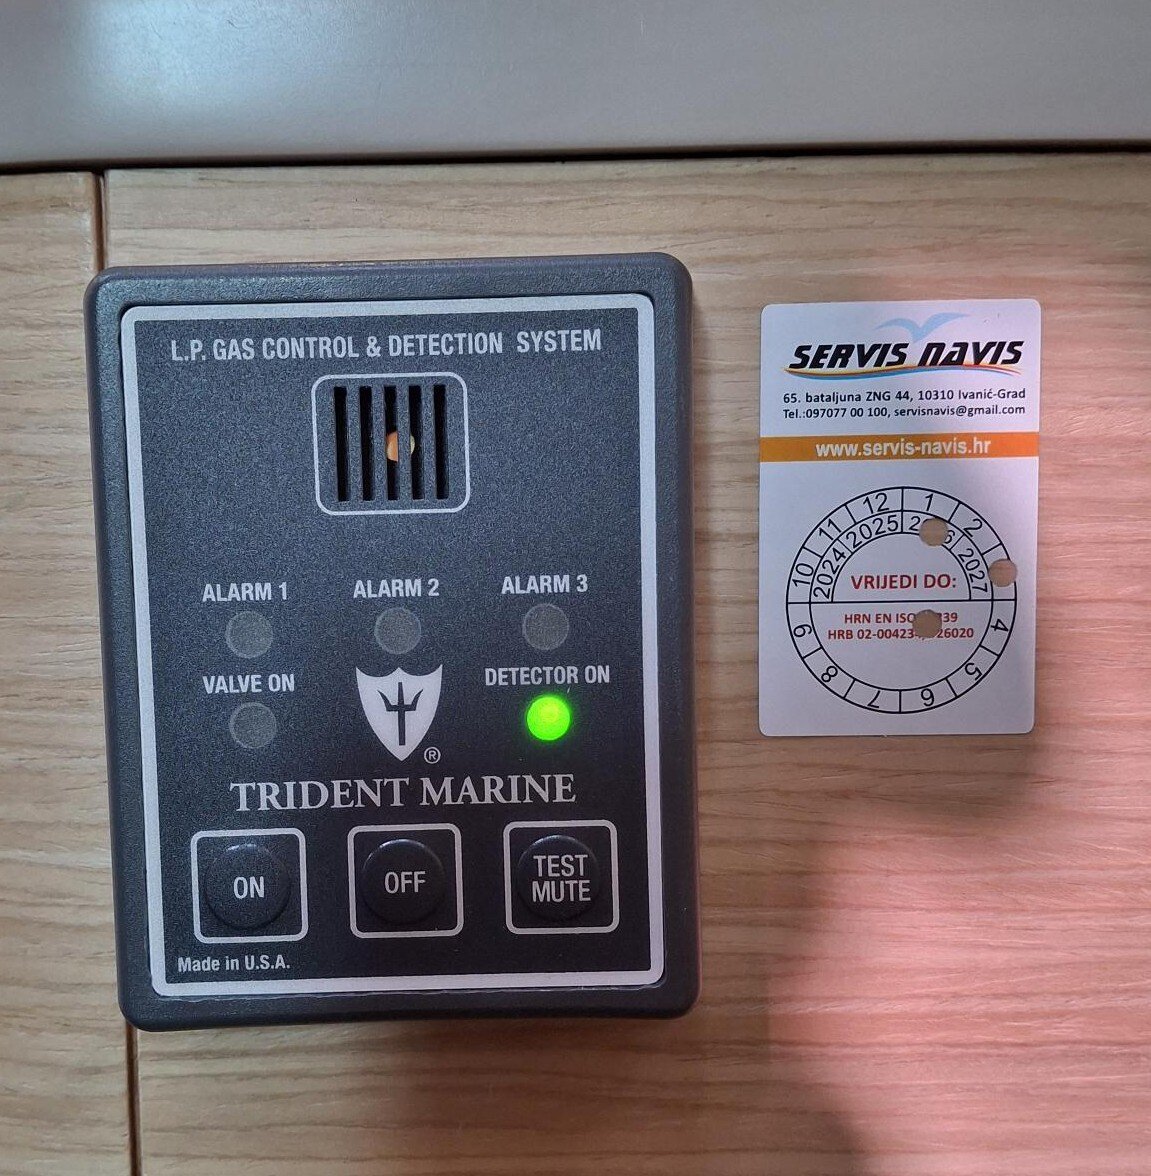
44.3 Dufour Emsland stove GLP
44.3 Dufour Emsland gas valve for outside grill
 BOW THRUSTER
 
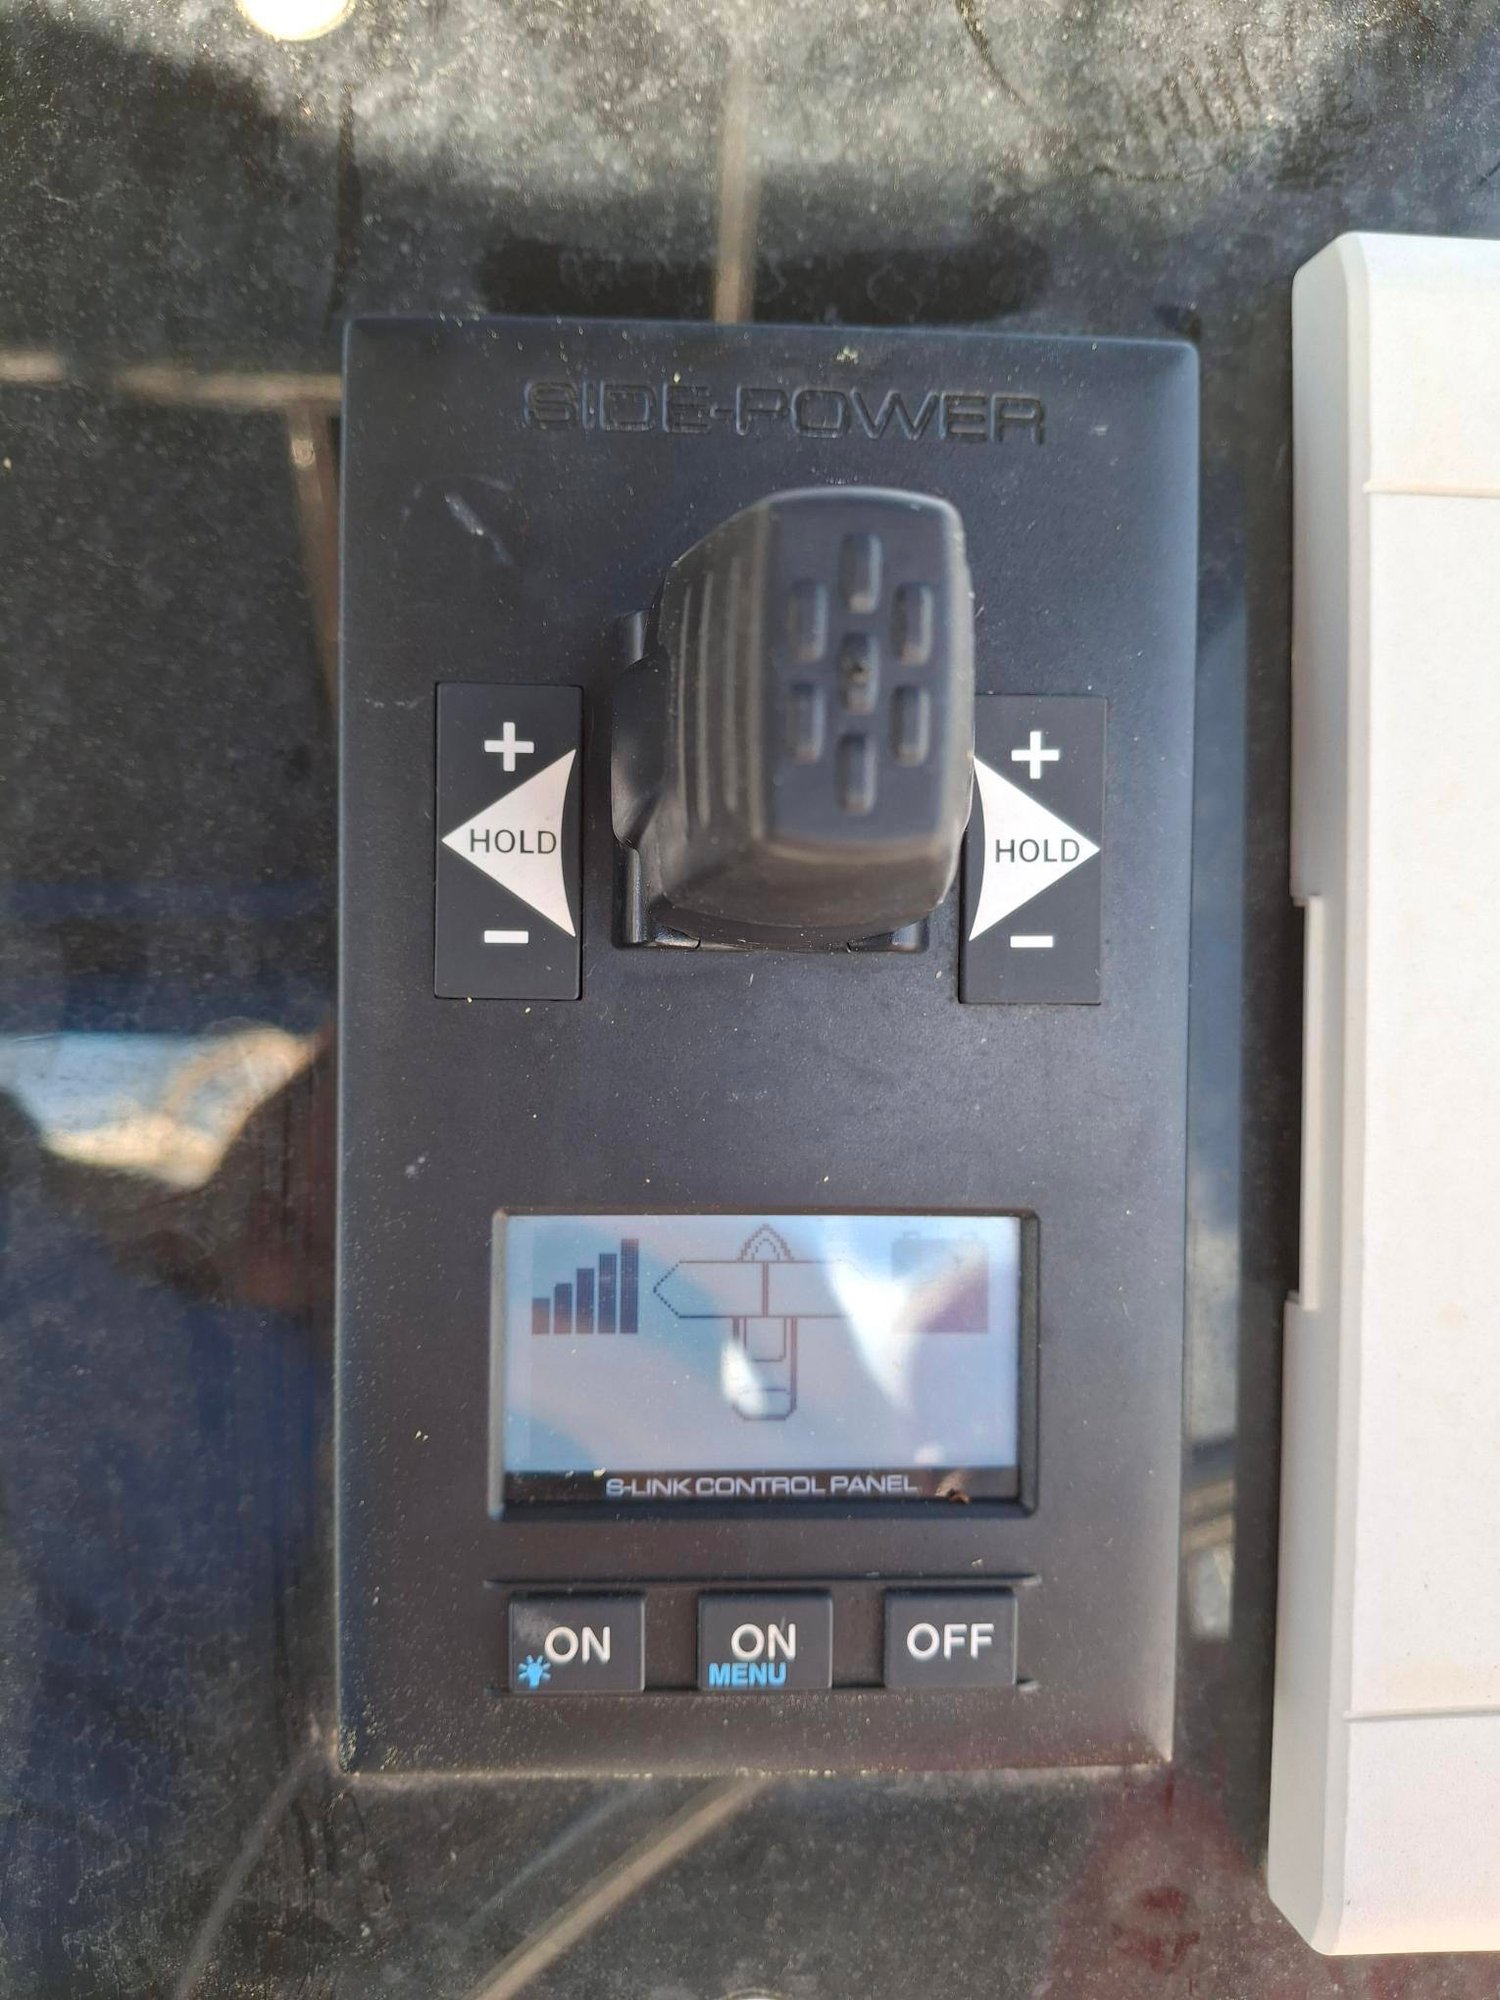
Bow Thruster control unit is marked with no. 10 on the boat layout picture, it is next to the starboard helm.
 
To use the bow thruster, make sure your engine is ON. Press the two ON buttons simultaneously. Then simply use the joystick to port or starboard depending which way you want your bow to move. Be mindful that the joystick is quite sensitive, so use a gentle touch. 
 
The buttons on each side of the joystick are going to HOLD your input (visible on the little display), so we recommend against using it like that. 
 
Remember to only use the bow thruster in maximum 5 seconds bursts. Otherwise it may burn out. 
 
To turn it off, just press the OFF button. 
 
44.3 Dufour Emsland bow thruster panel
 UNDER THE BACK CUSHION
Duf 44 Emsland behind back cushion-1
 
Removing the backrest cushion in the saloon (marked with no. 11 on the boat layout picture) reveals the Trip Switches for all Air Conditioning units (to the left) and the Shore power (to the right). In case your A/C stops working or you lose shore power electricity, check here to see all switches are in an upward position.
 
To use shore power electricity: 
  • Plug in the shore power cable (double check the connection wasn't lost in the locker) 
  • Check to see if there is power coming from the shore source (sometimes you will need a marinero's help, or there is a switch on the power box on the dock)
  • Go to the side compartment in the port stern cabin and double check it is set to shore power (2) (and not on generator source-1)
 
See the A/C section to see more about A/C usage on this boat. 
 
 
 ABOVE DECK
Duf 44 Emsland plotter
 
This boat has a single rudder, and its depth is set from the water line. 
 
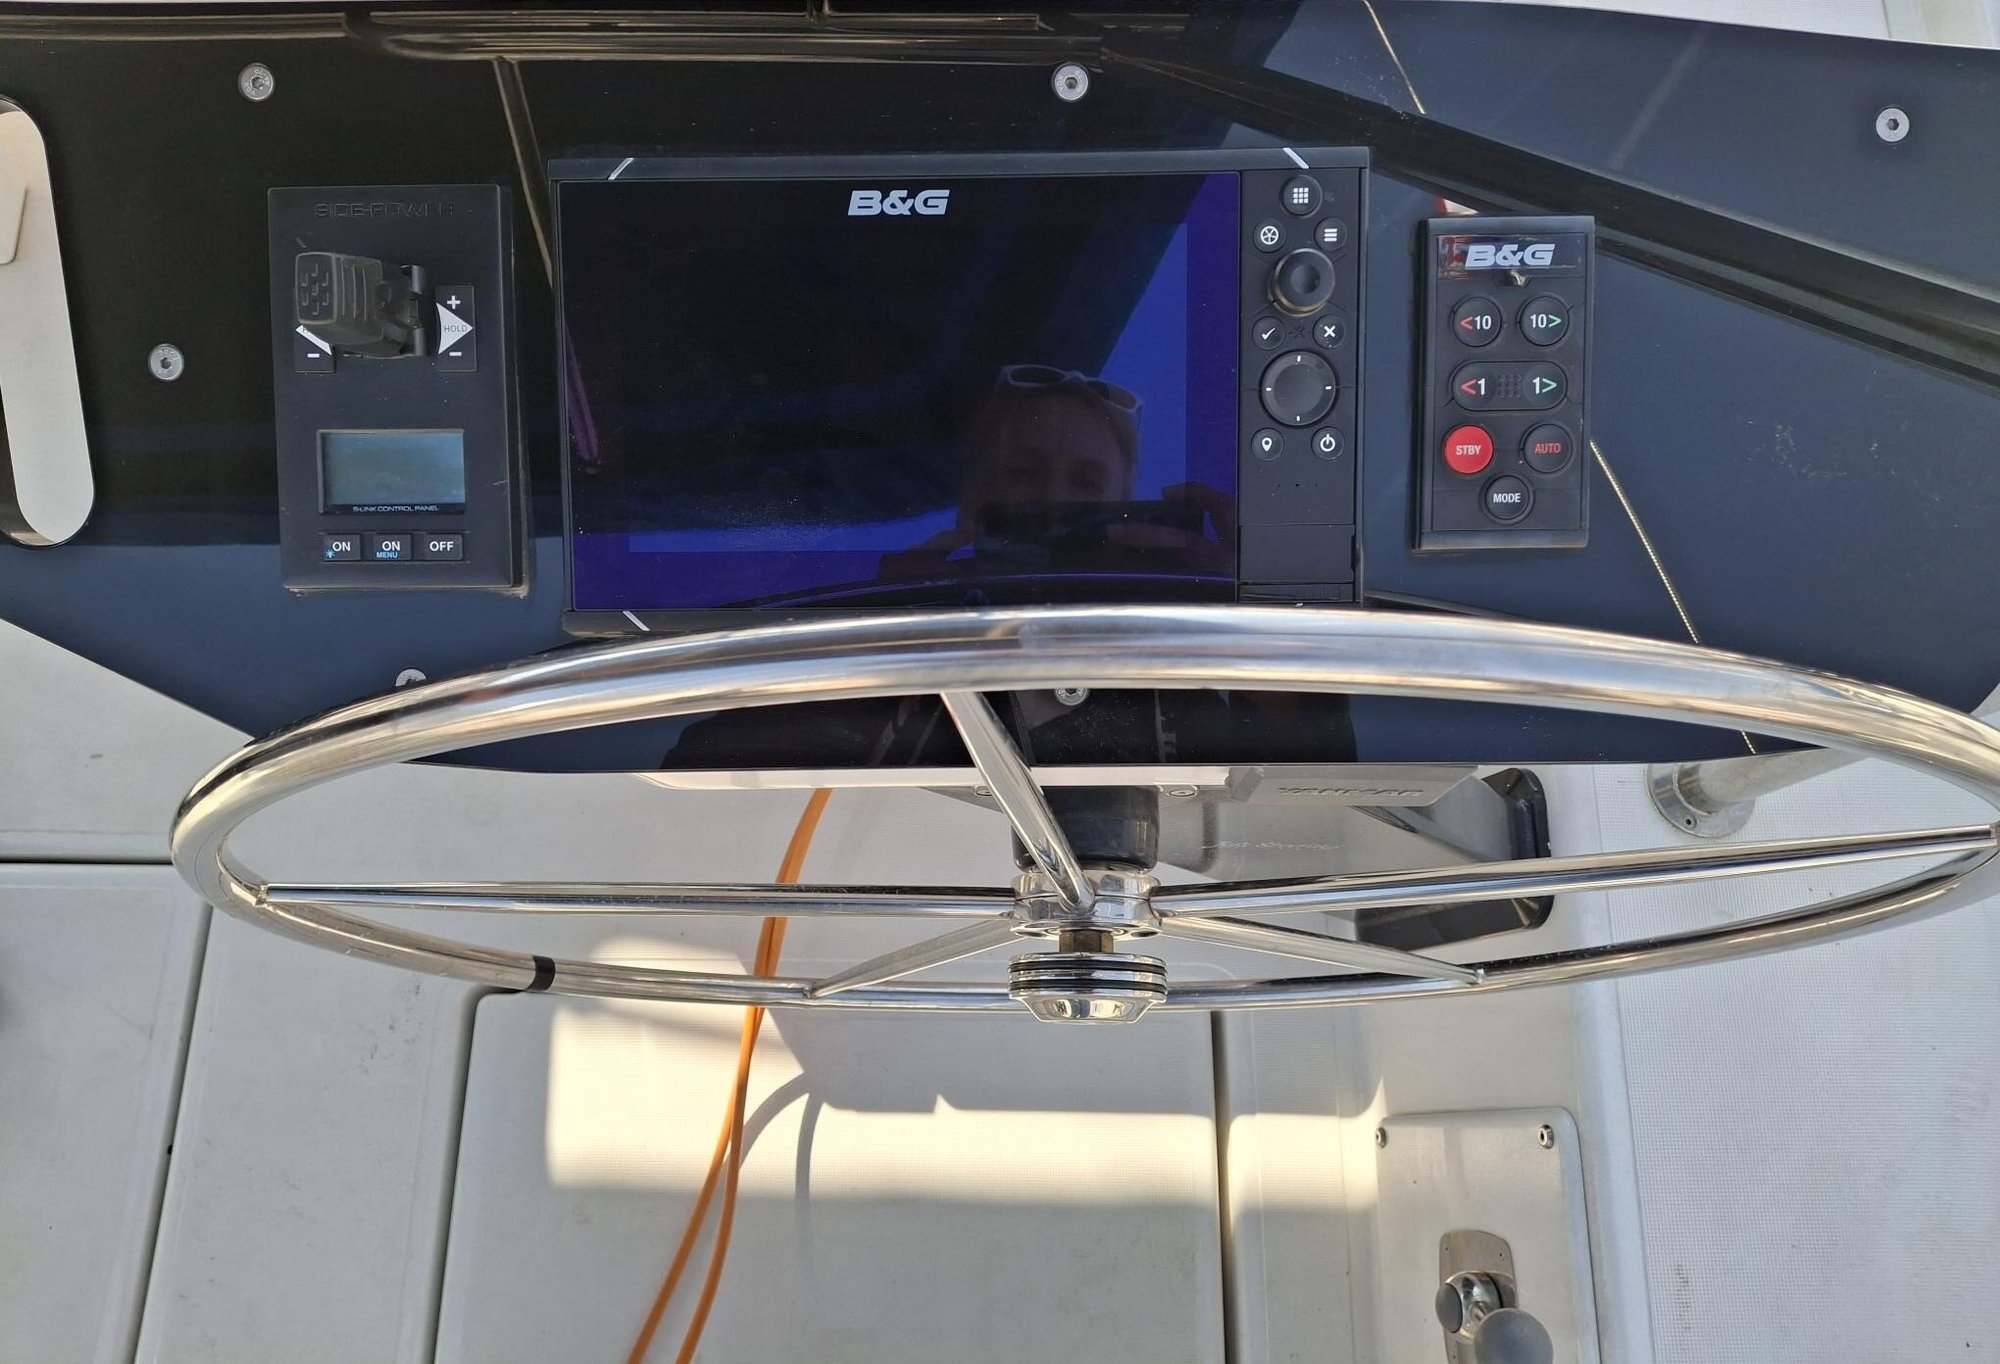
The navigational equipment is B&G, and at the helm, you can see the MFD - a multi-functional display with the chart plotter, windex, and audio and autopilot functions. Next to it is a little panel just for the autohelm. On the side will be a bow thruster control panel, the throttle, the anchor chain counter and control, and the engine control panel. The boat also has a steering lock at both helms.
 
There are three electrical winches above deck, and all the lines are marked on the jammers. Make sure to go through the inventory list in your check-in booklet before sailing out to check you've got everything you need in your lockers. 
 
This boat can be set for a self-tacking jib, however we set it up for manual manouvering. 


MULTI FUNCTIONAL DISPLAY

There is one MFD next to each helm. The starboard one is the master screen. Make sure your NAVIGATIONAL EQUIPMENT and ELECTRONICS is ON on the 12V main panel in order to use it. 
Choose the CHART segment to open charts. The SAIL STEER segment will show you the data for wind speed and direction. To view both on one screen you can customize your view on the right side of the screen. 
On the left side will be AUTOPILOT and AUDIO buttons, too. Mind that the touch screen is quite sensitive so we don't recommend relying on those while under way. 

CHARTS

Charts are fairly easy to use with the touch screen. You can build your routes simply by long-clicking the part of the chart needed and go to BUILD ROUTE. Select the CLEAR CURSOR on the bottom right to always re-centre your charts to your boat. 
To change the view between North Up or Head Up, select the three dashes symbol on the charts, then find the MORE OPTIONS, and change the ORIENTATION. 

AUTOPILOT

Try to use the separate panel for autopilot engagement. Once you click the AUTO on the panel, the boat will be set on autopilot and hold the course. Remember to always keep a lookout even when on autopilot. Clicking the - or + 1 will adjust the direction 1 degree to port or starboard, while -10 and +10 will do so by 10 degrees. The screen will also show that your autopilot is active. To disengage the autopilot, click STBY. 
 

DECK SHOWER

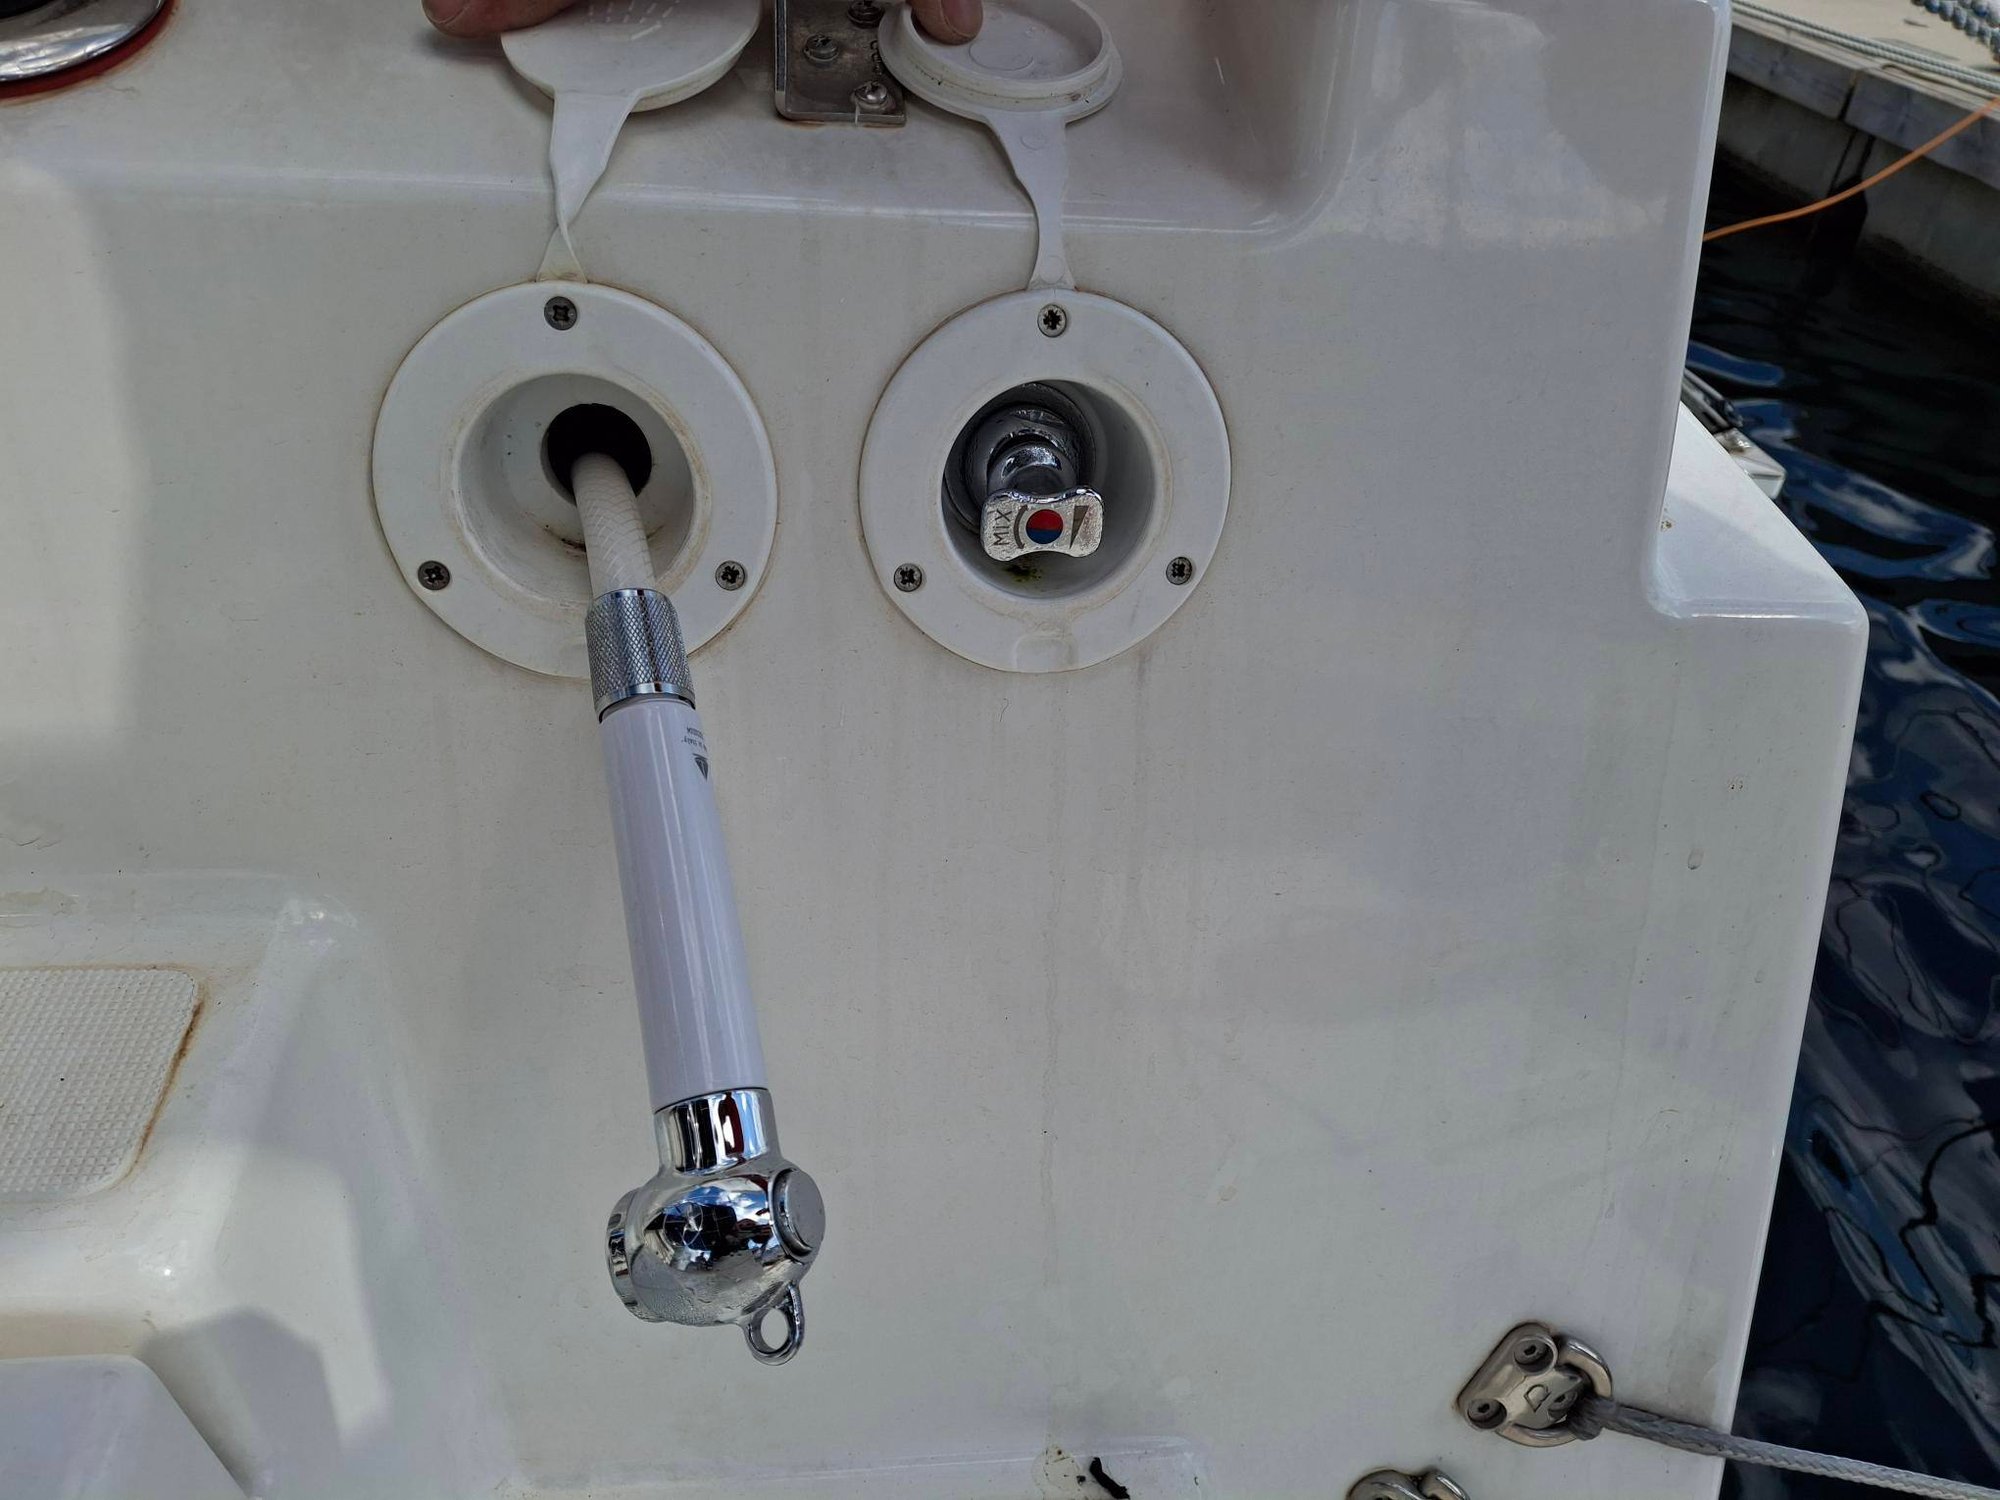
Next to the Diesel intake, marked on the boat layout picture, there is a deck shower. To use it, make sure your water pressure is on on the main panel. You need to switch on the valve to use it, and you can also adjust the water temperature. 
If it seems the deck shower isn't working, try getting the whole hose out, it could just be tangled in the locker. 
After you are done with deck shower usage, please close the valve and then empty the pressure from the hose to prevent damaging the hose under pressure.

LOCKER UNDER THE FLOOR

Marked with 10a on the boat layout picture is the main shore power trip switch. In case you don't have shore power or A/C on board, check here to see all the switches are in the upright position. Our advice is to also check on shore to see the town quay or marina have supplied your boat with electrical power, or if there is a switch you haven't flicked. Additionaly, check behind the back cushion for switches, and on your Scheiber panel inside the boat before calling the base for support. 
 

OUTSIDE GAS GRILL

Marked with the number 12 on the boat layout picture is a well-hidden gas grill and a little sink. Open the seating locker, turn on the LPG control under the sink inside, remove the grill rack, push the ignition button, and press and turn the knob fur usage. 
 
Ben 52 Mary Lou BG navigation (7)
Ben 52 Mary Lou BG navigation (5)
44.3 Dufour Emsland deck shower
44.3 Dufour Emsland ACDC outside locker
Duf 44 Emsland grill
  CALL US! 
 

STILL NOT WORKING? CALL US ON OUR TECHNICAL SUPPORT NUMBER FROM YOUR BOAT PAPERS:

WE ALSO USE WHATSAPP!! 

If we do not pick up immediately, please send us a WhatsApp with the name of your boat and problem description, and we will call you as soon as possible. Also kindly note that calls between 22.00 and 07.00 are considered emergency situations. Details about Sunsail and The Moorings 4-hour commintment can be found below: